I tested Kolari ND filters
Last update: 06/23/2026
Our blog continues to grow thanks to you, our readers. This post may contain affiliate links, which means we can earn a small commission if you make a purchase through them, at no extra cost to you. This helps us to continue to bring you more and support our work!
If you’ve been following our travel and photography blog for a while, you probably know that I’m passionate about filters in photography. Even though camera dynamic range keeps improving, I still prefer using filters and trying to get the image right in camera rather than spending too much time in post-processing. In this new review, I’ll be talking about ND (neutral density) filters from Kolari Vision.
In case you’re wondering, an ND filter is one of the few effects you really can’t reproduce properly on a computer. Depending on its density, it is more or less opaque—in other words, darker. It lets you slow down the exposure time while shooting by limiting the amount of light that reaches the sensor. This makes it especially useful for long exposures of moving subjects, such as the sea, waterfalls, carousels, and more.
This article was written in partnership with Kolari Vision, who contacted us to test their new ND filters. Kolari is a brand particularly well known in the world of infrared filters. Curious to see how these filters performed, especially given the good feedback we had heard about the brand, we agreed to test two of their ND filters: an ND64 (6-stop) and an ND1000 (10-stop). As usual, our opinion in this article is completely unbiased, and we remain fully in control of everything we write.
Even though we tested two ND filters from the brand, they share many of the same qualities, such as build quality, packaging, handling, vignetting, and more. So we decided not to separate the two filters in this review. We received them after a long wait here on the island of Tahiti. To be fair, in the middle of a pandemic, shipping times were pretty long… Kolari sent both filters in a 77mm diameter, which is what I asked for so I could use them on my Canon 16-35mm f/4 wide-angle lens. Note that these ND filters are also available in several diameters, from 49mm to 82mm.
Packaging
Let’s start with the basics. Of course, you could argue that the packaging of an ND filter is not the most important criterion when choosing one. That’s true, but in my opinion, it is still part of the review, and it can also say something about the professionalism of the brand.
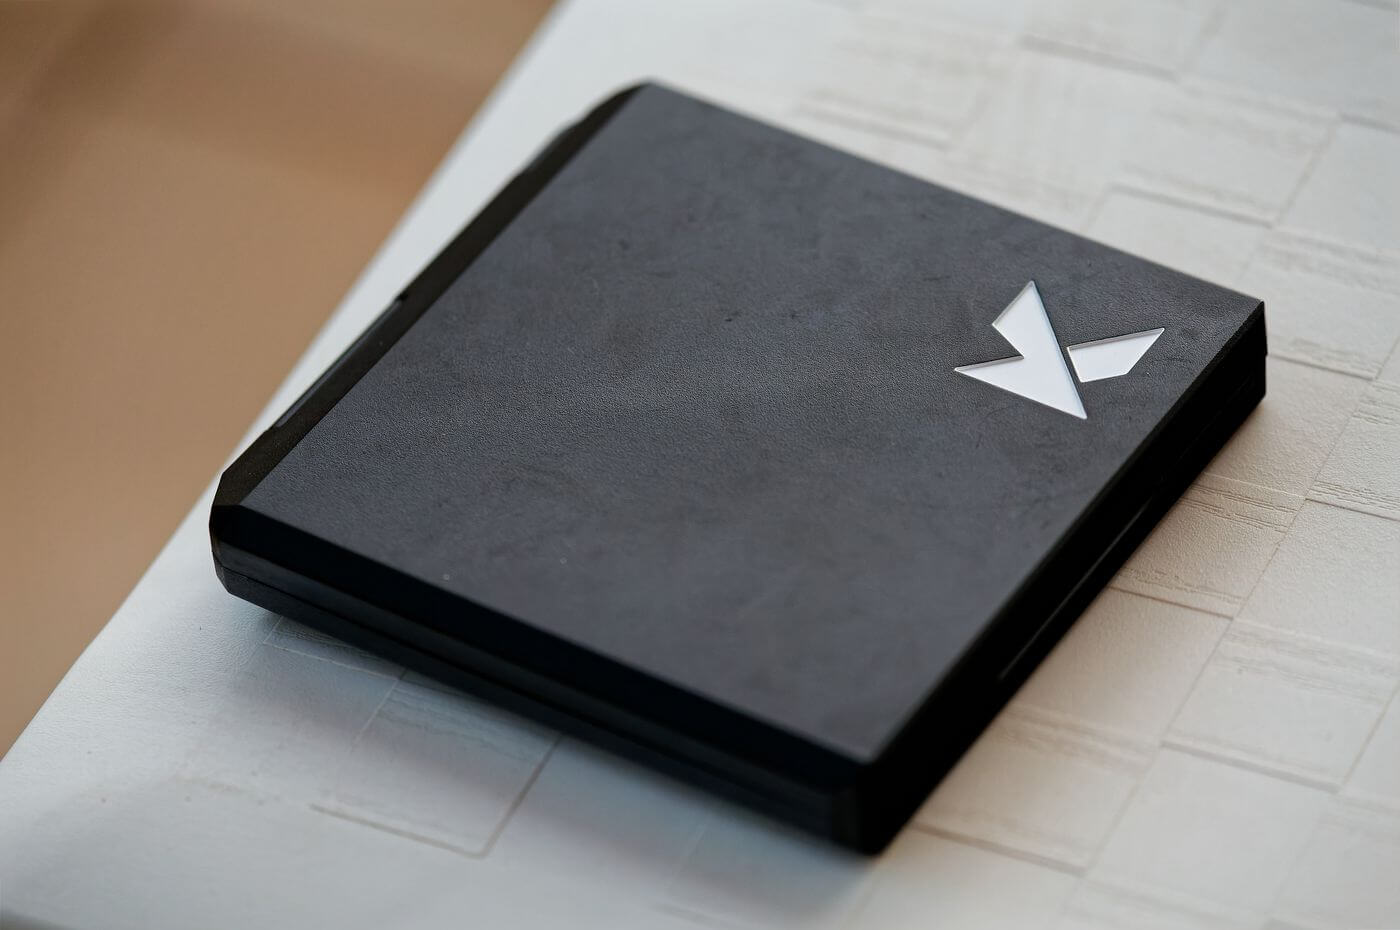

The packaging comes in the form of a very sturdy matte black plastic box. The square case is quite large and feels perfectly solid. I really like the exterior design, especially the raised white “K,” which immediately recalls the Kolari brand. When you open the box, you feel a little resistance, which shows that they chose a magnetic closing system. In fact, four magnets are visible on the outside of the box. It’s a pretty clever idea! Inside, black foam keeps the filter well protected. The ND filter is easy to access thanks to four finger cutouts in the protective foam. If you lift the filter, you can see the perfectly shaped slot designed to hold and lock it in place. In short, to me, the packaging is both beautifully designed and very practical. I was impressed by the packaging of both filters, which is identical.
Handling and build quality of the filter
When I first discovered the 77mm filter and held it in my hand, I immediately felt its physical quality. I didn’t weigh it on a scale, but I can say that it feels like a “heavy” filter in the best sense of the word. The outer part of the filter is made of brass. This has the advantage of being stronger than conventional filters; it is heavier, less prone to jamming, and less susceptible to oxidation and corrosion.


The outer edge of the brass filter is notched, with attractive grooves about 1 to 2mm wide. This is really well thought out and gives you an ideal grip compared with the standard filters I usually use. On the edge of the filter, between the notches, you’ll find the inscription “Kolari 77mm 5 Stop IRND”—and “10 Stop” on the other filter, of course. This designation is also written on the inside of the filter.
As for the glass, it is made from highly resistant Gorilla Glass, the same type of glass used for iPhones and other smartphones. It has a very good reputation and is highly resistant to drops—I dropped it twice during my test, with no issues—and scratches. It is also water-repellent, which makes it easy to remove mist or water droplets without smudging. The filter also looks very thin.
Vignetting
This is another very important point when choosing a filter. If you use it for landscape photography, chances are you’ll be shooting with a wide-angle lens, such as a 16-35mm on a full-frame camera. Note that my Canon 16-35mm f/4 accepts classic screw-in filters, but that isn’t the case for every lens, especially those described as ultra-wide-angle lenses. I’m thinking in particular of 12-24mm and 14-24mm lenses, as well as the very good Sony 14mm f/2.8 GM, which had just been released at the time.
I ran a few quick tests on different subjects and noticed almost no visible vignetting when using the filter on my 16-35mm at 16mm on a full-frame camera (Canon 6D). You clearly don’t see the filter appearing at the edge of the image, as can sometimes happen with non-slim filters, or even with some slim but slightly thicker filters. I measured the filter, and it is 5mm thick, which is better than my Hoya HD slim filter (8mm).
Below is a comparison of a photo with and without the ND filter mounted on my 16-35mm at 16mm.


As you can see, the Kolari ND64 filter has no impact on vignetting, even at 16mm on a full-frame camera
Sharpness
Another important point when choosing an ND filter is its impact on final image quality. The filter—and therefore the quality of the glass used—should not affect the sharpness of your image. I also carried out several precise tests and zoomed in to 100% in DxO, the post-processing software I use every day. I didn’t notice any loss of quality when using the ND filters. You can judge for yourself with the image below.


Across the ten or so field tests I was able to carry out, I didn’t notice any loss of quality between the images shot with and without the ND filter
Coating
In my opinion, the filter coating is really well done. It is presented as water-repellent. I tested it by pouring a few drops of water on the filter, and I was honestly surprised by how easy it was to wipe clean. Nothing to complain about here.
Color rendering
Where we expect the most from an ND filter is its impact on the natural colors of the image. Some ND filters clearly tend to shift colors. If you shoot in JPEG, that matters because your white balance will be off, and you’ll end up with an image whose colors do not look accurate. If you shoot in RAW, it is less of a problem, but you will still need to correct the white balance in post-processing.
I’m thinking in particular of high-density filters like an ND1000. So I was especially curious to see how these Kolari filters would perform in this area. For example, I’ve used the famous Lee Big Stopper filter (10 stops), which completely throws off the white balance and gives the image a very cold tone—not to say a completely blue cast. Of course, I was able to correct it in post-processing because I was shooting in RAW, but I had to warm up the scene by about +15,000K.
To explain the “test methodology,” I simply shot different subjects in different locations, always in manual focus, without stabilization, on a tripod, and in RAW. The white balance was set to “Auto” while shooting, and I then adjusted it later in post-processing, since the camera could not use exactly the same white balance for two images taken a few seconds apart, with and without the filter. I then compared the two images in DxO, making sure the white balance was identical in the software. Ultimately, the goal was to see whether there was any color cast between the two photos, with and without the filter.
I decided to run several field tests. I did the first one inside my house, on a set of clothes in different colors so that we could easily see any impact on them. I must say, I was blown away: both the ND64 and ND1000 filters had virtually no impact on the colors of the images. I’ll let you judge with the two images below. Other people who tested these filters found the same thing.


As you can see, the Kolari ND1000 filter offers superb color neutrality. I dare you to find any difference with and without the filter!
I won’t show you the same image with the Kolari ND64, because it is completely identical, with no influence on white balance
I also made a comparison to show you the difference in color rendering between the Kolari ND1000 and the Lee Big Stopper, which is also an ND1000—even though the goal here is not to compare Kolari filters with other brands.

The difference in rendering is huge. The Lee Big Stopper ND1000 filter really tends to affect white balance a lot. Clearly, it’s quite obvious that the Kolari ND1000 filter is much more neutral.
I decided to do another outdoor test on a specific subject: a tree trunk in a park. In the end, the result was the same as indoors.


Here is a 100% crop of a coconut tree in an outdoor park — the result is identical, with no visible difference with or without the ND filter, which shows the excellent neutrality of Kolari ND filters
In the end, I find that these filters offer superb color rendering that stays true to reality. It’s almost perfect, whether with the ND64 or the ND1000.
Conclusion
That brings us to the end of this review of the Kolari ND filters. I was really pleased with these new ND filters; they truly are remarkably good. The packaging is very well designed, the filters are really thin (which limits vignetting perfectly), the glass quality is superb and does not affect image sharpness, and both the construction and handling are excellent. Most importantly, I didn’t notice any color cast when using them. I haven’t tested every ND filter out there, but I have to say that these are the best ones I’ve tested so far.
If you want to buy this superb ND filter, you can go through the following link.
In the meantime, if you want to read more, I invite you to read our full article explaining in detail how to choose your ND filter.
From now on, we’ll try to test more and more photography gear and accessories. If you are a brand interested in a photography gear review, feel free to contact us!
See you soon.

Written by Sylvain PONS
I've been passionate about photography since 2010, learning as I went along. Today, I dedicate myself to guiding others in their choice of camera gear and sharing a variety of tips to improve their photography skills.
Despite our care, a mistake may have slipped into this article. If you find any, please don't hesitate to let us know so we can correct it as soon as possible and keep our information up-to-date!