The rule of thirds in photography
Last update: 06/22/2026
Our blog continues to grow thanks to you, our readers. This post may contain affiliate links, which means we can earn a small commission if you make a purchase through them, at no extra cost to you. This helps us to continue to bring you more and support our work!
If you are a beginner and want to learn photography, there is a good chance you have already heard about the famous ‘rule of thirds’ in photography. I wanted to begin this photography blog by talking about framing and composition, and this is one of the first principles you need to understand and master.
Every photography beginner comes across this rule at some point and learns how to use it. In theory, there is nothing too complicated about it: it is simply a compositional principle passed down over the last few centuries to help you frame a photograph in a more balanced way. The “rule of thirds” should be seen as a guideline, a photographic technique and an important principle. You need to understand it before you can use it properly. Learning how to frame, capture and preserve the scene in front of you is essential if you want to progress in photography. If you want to take beautiful pictures, it is not just a matter of pressing the shutter button. If you are new to the subject, you can refer to all the articles on the basics of photography.
I should point out that many famous photos, or photos considered successful, do not actually follow the rule of thirds at all. So you are not obliged to respect this rule, but it is important to know it. If you want to improve your photos, you will need to understand several “rules” or ways of thinking about composition. I am still learning every day myself…

If you are a photography beginner and would like to learn more about composition rules, I recommend taking a look at these three photography books on Amazon:
In this article, I will explain exactly what this rule is, what types of photos it works best for, when it is most useful, and I will also show you a few counterexamples. Keep in mind, however, that even if you do not apply the rule of thirds strictly, it still has one major benefit: it makes you think about your composition, and that is a huge part of making a good photo.
The rule of thirds in photography: how it works
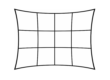
Let’s start with the basics by explaining what this famous rule of thirds is all about. The principle is very simple: you take an image and draw two horizontal lines and two vertical lines, creating nine equal rectangles. This gives you four intersection points where the lines cross. These are often called points of interest or power points. The most important compositional elements should then be placed along these lines or at their intersections. It is no more complicated than that. The idea is that the human eye naturally tends to focus on these lines and intersections when looking at a photograph.
Just between us, if you are a beginner and are just starting out with your DSLR, and if you have trouble imagining these four lines, you should be able to display them in your viewfinder. Check your camera manual to find the right setting. When you start, the goal is to place your subject on one of the image’s power points while using the guidelines to create more balanced proportions. You are under no obligation to do this, of course, but in the paragraph below I explain why it can be useful. Practice by taking pictures yourself, try to identify the subject you want to highlight, and then apply these principles. What do you think?


I admit these photos are not mine and the lines are not perfectly positioned, but here are two examples of the rule of thirds applied to two different types of photography!
What's the point?
You may be wondering what the point of using this type of rule is. Why not simply do whatever you want? The simple answer is that this rule helps you highlight a subject in a clear and effective way. In the Western world, we are used to reading from left to right and from top to bottom. This can also be applied to photography. Try it, and you will see that you often “read” a photo almost as you would read a book.
The goal, then, is to use these imaginary guidelines to divide the image, highlight the points of interest and create balance between your subject and its surroundings. And don’t forget, as we have already discussed in other articles, the purpose of a photo is often to highlight something: an object, an atmosphere, a texture, a color, and so on. Now let’s get into the details.
The rule of thirds in photography in different situations
I want to show you a few examples where the rule of thirds has been applied more or less strictly, and how it helps guide the interpretation of the photo. In most cases, these are photographs I personally took during my travels.
Landscape photography
I think it is safe to say that this is one area where the rule of thirds and the use of power points make the most sense. You might think landscape photography is easy because you simply have to photograph the scenery in front of you. In reality, I find that this is one of the fields where you can really see the difference between someone who is interested in photography and tries to compose carefully, and someone who simply “clicks”…
This first photo was taken in the Ngorongoro Crater during my safari in Tanzania. In this case, there is no obvious power point in the image, but I tried to convey the sense of immensity I felt inside the crater. Since the sky was very bland and uninteresting when I took the photo, I chose to highlight the endless savannah instead. You will notice that the savannah stops more or less on the upper horizontal line of the rule of thirds. The dirt track guides your eye towards the back of the image, where you can see the crater. Here, it works more as a leading line guiding the gaze, even though the right edge of the track follows one of the thirds fairly well. The final image feels dynamic and creates a strong sense of depth.

Here I have chosen two more extreme examples. I did not follow the rule of thirds perfectly here, but the general idea is clear. I wanted to show that the rule of thirds can also work very well in portrait orientation, even in landscape photography. The image on the left was taken at the famous temples of Bagan, Burma. As you can see, the sky was uninteresting: grey and low in contrast. However, I chose to make the subject stand out, the temple at the bottom right, by placing it almost exactly on a power point. The fact that only a very narrow strip of vegetation remains at the bottom, while the space above is almost uniform, helps the subject stand out very clearly in the image.
The other image, on the right, was taken in the mangroves of Ibo Island during my trip to Mozambique. It was captured during a sunset I don’t think I will ever forget. This is another fairly extreme example, with the colorful golden foreground and the magnificent reflection in the water still visible in the mangrove. Once again, even if we cannot strictly speak of a line, the eye is drawn first to the foreground, towards the dark spot at the bottom left, which I deliberately placed there to balance the photograph. If you look closely, you should notice a sequence of dark marks that lead you through the image towards the upper right and the isolated tree, which is placed on a power point. Hopefully, you are starting to understand some of the subtleties of the rule of thirds. You can, and sometimes should, place an element in direct opposition to your subject to create counterbalance and therefore balance the image. The objective is to make certain key points in your composition stand out or feel more intentional. Do you want to know more about photo composition?


Wildlife photography
This is another field of photography where the rule of thirds can apply to a certain extent. In my opinion, it may be less central than in landscape photography, but it still has a role to play, especially when you want to give the photo meaning, a sense of direction and even a little room for imagination.
I would like to show you two more examples of photos I have taken. The first one below was taken in a small village in central Thailand. I photographed these monkeys for quite a while in beautiful golden natural light at the end of the afternoon. This will be the subject of another article explaining why the time of day is so important in photography. Unlike landscape photography, wildlife photography involves living subjects. The idea is therefore often to use the rule of thirds in a way that gives the animal a sense of direction. In this case, the animal’s eye does not perfectly align with the rule of thirds, but its head is well placed on the left line, deliberately leaving space on the right in the direction of its gaze. Doing the opposite, by placing the animal on the right side of the image, would have been a mistake and the final result would have felt very different.

The other photo shows a different scene: the gaze of a lion in the savannah in Tanzania. Its eyes seem to be searching for something. The subject, the lion, is not perfectly placed on a power point, but it does sit on the right vertical line of the image, which lets you follow its gaze and imagine what it might be looking for. The idea was to make it clear that the lion was searching for something, perhaps prey. Its gaze moves towards the left side of the image, and by leaving space in that direction, the intention becomes clear. Ideally, I think I should have shifted the lion a little further to the right…
In wildlife photography, beyond knowing how to position an animal correctly within the frame, other technical points come into play, such as using a wide aperture to reduce depth of field and blur the background. This is not systematic, especially if you want to focus on the whole scene rather than take a close-up of the animal.

Portrait photography
This is clearly a subject I am less familiar with, although I have tried it several times. If you look at a lot of portrait photography, you will often notice that the eyes are emphasized and very often placed on a power point within the rule of thirds.
Here is a picture I took in a village in Mozambique. It is almost documentary in style because it was not posed; it was taken spontaneously, in the street, with children. I deliberately wanted to create a slightly off-the-cuff image by cutting off part of the subject’s head while placing his eyes on a power point along the left line. The photo is not perfect in itself, but I like the final result and what it reveals. For the record, the children did not have real toy cars to play with. They simply made their own out of old bottles and Coca-Cola caps. From a Western perspective, where almost every five-year-old seems to have an iPad these days, it is beautiful to see!

Of course, you can apply this rule in other areas such as urban landscapes, in macro photography or in nature photography.
The counterexample: centering your subject
I am deliberately ending this article with a counterexample to the rule of thirds. As mentioned in the introduction, the goal is not simply to follow a rule, but to draw inspiration from it to give meaning to your photos. In some cases, the rule of thirds does not necessarily work, and it can be very interesting to center your subject instead. I am thinking in particular of architecture, street scenes with buildings, or photos where you can create strong symmetry.
In the picture of my house below, believe it or not, the photographer deliberately chose to center the subject. The symmetry is almost perfect, and in this case, centering the house makes sense. The photo on the right is another example where centering the subject works very well and helps create a beautiful image.


That’s it, I’m coming to the end of this article. I hope I have been clear enough and that you now have a better understanding of the famous rule of thirds in photography. If you have any questions or comments, feel free to leave a short message. I mentioned leading lines several times in this article, and in a more detailed article, I will explain how to use them to highlight your subject.
However, keep in mind that it is possible to retouch, or rather crop, an image that was poorly framed at the time of shooting. In my opinion, the ideal is to get the composition as right as possible in the field, so you spend as little time as possible in front of your computer. To continue learning, I invite you to read about exposure in photography.
If you liked the article, feel free to share it.
In the meantime, enjoy taking photos.

Written by Sylvain PONS
I've been passionate about photography since 2010, learning as I went along. Today, I dedicate myself to guiding others in their choice of camera gear and sharing a variety of tips to improve their photography skills.
Despite our care, a mistake may have slipped into this article. If you find any, please don't hesitate to let us know so we can correct it as soon as possible and keep our information up-to-date!