How to back up your photos while traveling
Last update: 06/22/2026
Our blog continues to grow thanks to you, our readers. This post may contain affiliate links, which means we can earn a small commission if you make a purchase through them, at no extra cost to you. This helps us to continue to bring you more and support our work!
After all, this is one of the things that really matters to any traveler: how do you back up your photos while traveling and make sure you don’t lose them? Even if we often say that travel memories mostly live in our minds, who wouldn’t be devastated after a year of traveling if all the photos and memories disappeared? For many people, backing up their data is a real priority.
Whatever camera you use — iPhone, compact camera, mirrorless camera or DSLR — finding a reliable backup solution is always a very good idea, right? Are you also looking for ways to shoot great images while traveling?
Backing up your photos while traveling
In my opinion, there are several types of backups. Whatever method you choose, always try to use two different backup solutions, such as a memory card and an external drive, two hard drives, or two separate cards.


Physical backups
When you think about storing photos or data, this is often the first type of backup that comes to mind: a physical backup you manage yourself, on something you can actually hold in your hand. The downside is that this solution is mostly designed for storage, not for sharing files, which can be a shame when you’re traveling.
Memory cards
This is ultimately your first backup, because it happens automatically as soon as you take a photo. There are countless memory cards available, with very different specifications depending on your needs.
To keep things simple, memory cards mainly differ by:
- Their capacity: from 2 GB to 32, 64, 256 GB and more;
- Their format: mainly CF (CompactFlash), SD/SDHC/SDXC (Secure Digital), or microSD cards for phones;
- Their read and write speeds.
There are several brands on the market, but almost everyone agrees that Sandisk and Lexar are among the best.
When you’re traveling, you already have at least one “automatic” backup on the card inside your camera. At a minimum, I would advise duplicating that backup onto another SD or CF card. Of course, to reduce the risk of loss or theft, always keep one card in your camera and the other in your larger bag, for example — but never both in the same place.
Be careful, though: depending on your camera, you won’t always need the same type of memory card. Here are a few card examples, for reference: for a compact camera (class 4/5), an entry-level DSLR or mirrorless camera (class 6/7), and a high-end DSLR (class 10).

Advantages: doesn’t take up much space, is light and easy to store, doesn’t cost much, and several cards may be enough to back up the photos from an entire trip.
Disadvantages: easy to lose because of their size, sometimes limited storage capacity if you shoot in RAW, for example, and no real way to share your photos with family or friends, except through social media.
External hard drives / USB flash drives
Here is the second option.
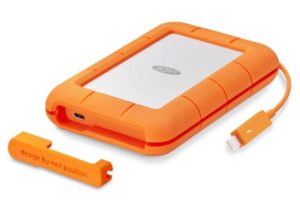
In any case, when traveling, I recommend backing up your SD or CF card onto an external hard drive, maybe even two. As with memory cards, keep one in your small everyday bag and the other hidden in your larger bag.
An external hard drive will allow you to store more data than a USB flash drive, although a flash drive is lighter and takes up less space. Keep in mind, too, that hard drives are generally much more fragile than flash drives.
If you choose the hard drive option, you should definitely buy a hard case to protect it during transport. There are options for every budget, from 500 GB to 1 TB. Western Digital is one of the best-known brands.
Computer backups
This is another solution that can work well when traveling. However, I strongly recommend never storing all your photos only on your computer’s hard drive.
During my last big trip, I always backed up my photos on my computer, on SD cards and on an external hard drive. So yes, triple backups.
Many people have had the bad experience of backing up their photos only on a computer and then losing everything. Don’t forget that:
- Your computer can fail at any time during your trip;
- It can be stolen.
So yes, I do recommend backing up your photos on your computer, but always with at least one other physical backup as well: SD card, hard drive, USB flash drive, and so on.
Sending backups home
Finally, one last solution that few people think about is sending your physical backups back home.
And yes, it’s not a bad idea at all: it means you’ll have a copy safely waiting for you at home in case something happens during your trip.
The easiest items to send are obviously SD or CF cards, as they are small and weigh almost nothing. A hard drive will be heavier, but still nothing excessive.

Personally, I would recommend placing it in a small, well-taped package rather than in a simple envelope or even a bubble envelope, which can be opened quite easily.
I once sent myself a package from Bangkok using economy shipping, and it arrived without any problems.
The main drawback of this solution is, of course, the risk of the package being lost or stolen along the way. That’s why I wouldn’t recommend relying on it alone either.
My own experience with physically backing up photos while traveling
Based on my experience during a one-year trip through Asia, I would recommend having at least three physical backups. First, keep the original files on your memory card — basically, leave all your photos in the camera. Then download your photos directly to your computer. After that, save everything to an external hard drive and keep it hidden in your bag. Halfway through the trip, you could even send one backup home. A bit paranoid, you think?
On top of that, I also chose to use an online backup on a secure server, which allowed me to share my photos with all my friends and family. That’s pretty much ideal, and it brings me to the second backup option.
Online backup / cloud storage
For me, this remains one of the safest ways to back up your photos while traveling. Ideally, you should combine it with one or two physical backups, as explained above. Of course, this solution also has its drawbacks.
First, you should know that there are several types of online backups. We can mainly distinguish between two options.
Cloud storage services
By cloud storage services, I simply mean all the websites that offer online storage on secure servers. iCloud backup is just one example among many. There are plenty of options, but a few stand out:
- Dropbox: This is one of the best-known services. With a Dropbox Basic account, you get 2 GB for free. There is also a Dropbox Plus plan that lets you store up to 1 TB for $100/year. Note that this is more than enough for most trips. What I like about Dropbox, even though I only use the free account, is the referral option. You get 500 MB each time, up to 16 GB. If you don’t have an account, you can create one via this link. By the way, I earn an extra 500 MB, and so do you, on top of the free 2 GB.
- OneDrive (formerly SkyDrive): 5 GB free when you open an account. Then it’s €2/month for 50 GB.
- Google Drive: Here, you get 15 GB for free. Several plans are then available, including one at €2/month for 100 GB of storage.
- Mega: A very interesting option, since they offer 50 GB for free.
All these services can be used to store your photos while traveling. Be careful, though: these are mainly storage services, not true photo-sharing platforms. Personally, I use the free version of Dropbox to store important documents during a trip. It allows me to access them from anywhere in the world, as long as I have an internet connection.
In my opinion, these services are less interesting now that other platforms allow you to both store and share photos.
Storage and sharing platforms
This is where things get very interesting. For me, this is the most reliable and secure way to back up your photos while traveling. I personally chose this type of platform before leaving for my trip to Southeast Asia. Today, living on the other side of the world, I have kept my subscription because it allows me to back up all my photos and videos, but above all to share them with my loved ones.

There are several platforms like this, including:
- Joomeo: This is the solution I’ve been using for several years now to store my data online. The free version is limited to 2 GB of storage, and there are two other interesting plans (€2.26/month or €4.51/month, depending on your needs). This excellent French photo storage and sharing platform lets you do almost everything: unlimited storage in the paid versions, organization by folders and albums, contact book, shared photo management, and more. You can sync all your mobile devices and retrieve your data as long as you are connected to the Internet. Transfer speed will then depend on your bandwidth.
In short, I’ve been convinced by this solution for several years now.
Advantages:
- You get access to unlimited space for the same price, or even less, than traditional storage services, which usually only offer storage;
- You can share photos with your friends and family;
- You have peace of mind during your trip, knowing you won’t lose your photos even if your camera or physical backups are stolen;
- You reduce the risk of data loss in case of hardware problems, such as a computer that stops working or a hard drive damaged by impact.
Disadvantages:
- You need an Internet connection to back up your photos, which is why I say this should not be your only solution;
- Depending on the country or location, connections can be very slow, making it difficult to transfer your data, especially if you shoot in RAW or with a full-frame camera. Large files will always be harder to upload.
The best solution, in my opinion, for backing up your photos while traveling
In the end, considering all the solutions presented in this article on how to back up your photos while traveling, this is what I personally recommend:
- Always keep the photos on your camera’s memory card — that is your first backup;
- Buy a hard drive with solid protection and download all your photos to it whenever you get the chance — that is your second backup. Alongside that, take a second hard drive to use as a third backup, which you can send home during the trip;
- Finally, choose a storage and sharing platform for the duration of your trip. I can recommend Joomeo without hesitation, since I use it daily. This will allow you to store your backups remotely and keep a safe copy online. On top of that, your family will be able to follow your entire journey as you go, instead of always having to rely on social media.
That’s it — I think I’ve covered all the main options for backing up your photos while traveling. What about you? How do you do it? Are you more into hard drives or memory cards?
See you soon,

Written by Sylvain PONS
I've been passionate about photography since 2010, learning as I went along. Today, I dedicate myself to guiding others in their choice of camera gear and sharing a variety of tips to improve their photography skills.
Despite our care, a mistake may have slipped into this article. If you find any, please don't hesitate to let us know so we can correct it as soon as possible and keep our information up-to-date!