Which camera settings should you choose for each situation?
Last update: 06/22/2026
Our blog continues to grow thanks to you, our readers. This post may contain affiliate links, which means we can earn a small commission if you make a purchase through them, at no extra cost to you. This helps us to continue to bring you more and support our work!
This is a question many beginners ask themselves: which camera setting should you choose, and when? I’ll say it right away: it’s never completely black and white. It would be far too simple if I could tell you, “for landscape photography, always use this; for night photography, always use that,” and so on.
And I have to admit that when you start learning the basics of photography, choosing the right camera settings can feel completely overwhelming. Quite often, most people begin by using their DSLR’s automatic mode because stepping out of that comfort zone feels difficult. Nothing is easier than switching to auto mode, pressing the shutter, and hoping the camera will do the rest to produce a beautiful picture.
Unfortunately, that is rarely how it works. Your camera will often make choices for you that are not necessarily the ones you wanted. The purpose of this article is to guide you toward a few habits you can use depending on the situation you are in and what you want to photograph. Each scenario below already has, or will have, its own dedicated article where I go into more detail, including composition, common difficulties and, in short, useful advice for each field!


In this article, I’ll cover the most common situations in photography and offer a short analysis to help you understand how to choose your camera settings and which direction to take. Of course, it will never be quite that simple, but I hope I can at least make things clearer. To understand everything mentioned below, you will need to master the basic ideas related to exposure in photography. It will also often help to have a good understanding of semi-automatic modes.
For each situation described below, I also suggest going further with one or two book recommendations, along with a few examples of photographic equipment suited to that type of shooting. Whether you use a compact camera, a mirrorless camera or a DSLR, these settings should already help you improve and take better pictures. Let’s get started!
To avoid repeating almost the same points throughout the article about the elements that make up exposure in photography, here is a very brief reminder of the three essential concepts you need to know. I’ll let you refer to the three dedicated articles in the basics of photography category. These are the three key points you need to understand to master your camera:
Aperture:
- It is the small number written after “f/”.
- It controls depth of field and helps define how much light reaches the sensor.
- The wider the aperture, the smaller the number (f/1.4), and vice versa (you’ll get used to it).
- The smaller your aperture is (for example, f/11), the less light reaches your sensor, which means you will need a slower shutter speed and/or a higher ISO sensitivity to maintain a good exposure.
ISO sensitivity:
- This is your camera sensor’s sensitivity to light.
- It usually starts at ISO 100 (sometimes lower, but rarely) and can go up to ISO 25,600 and beyond (even up to one million on some cameras, though image quality will be heavily degraded at those values).
- We use low ISO values (100 to 400) when there is enough light.
- When light is lacking, we raise the ISO (800, 1600, 3200, etc.).
- Raising the ISO allows you to shorten the exposure time or keep a smaller aperture.
- Increasing ISO generates digital noise (artifacts caused by signal amplification).
Shutter speed:
- This is the length of time your sensor records the light it receives.
- It can range from 1/8000s (or even faster on some cameras with an electronic shutter) to several seconds, minutes or even hours if needed.
- You need to watch out for camera shake and motion blur at slow shutter speeds, unless that is the effect you want.
Static subjects (landscapes and architecture)
Generally speaking, these are subjects often associated with a wide scene that is sharp from front to back. Both fields mainly aim to convey a sense of scale, whether you are photographing a landscape in front of you, a room or a building in architectural photography. Very often, this type of image is taken with a wide field of view to give more depth to the picture. We often use wide-angle or ultra-wide-angle (WA/UWA) lenses. In landscape photography, it is also perfectly possible to capture landscapes with a longer focal length, such as 200mm or 300mm. In that case, you will need to pay attention to your shutter speed. Using a long focal length is a specific situation: the longer your focal length, the faster your shutter speed will generally need to be (and vice versa). It is often recommended to use a shutter speed at least equivalent to your focal length (ideally 1.5x, or even 2x depending on your sensor size).
In terms of camera settings, both types of photography are often shot with a small aperture (between f/8 and f/16). Sometimes, you may want to highlight part of the landscape or create a more aesthetic effect by blurring part of the foreground or background. This can work well with leaves, branches or even an unattractive foreground. In that case, you may use a wide aperture (for example, f/1.4) to blur these elements or by getting closer to the foreground.

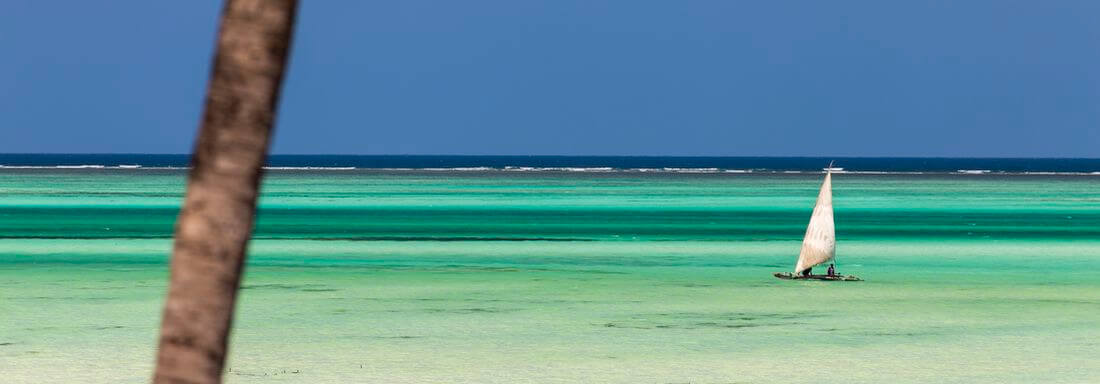
In the middle of the day, landscape and architectural photography rarely cause major problems when it comes to camera settings. We generally recommend using the lowest ISO setting (100 to 200) and a small aperture (f/8 to f/16). Personally, I recommend shooting landscapes in Av mode (Canon) or A mode (Nikon). You simply select the lowest ISO (or even leave ISO on auto), choose your small aperture, and the camera automatically calculates the shutter speed. If you use a wide-angle lens, shutter speed will rarely be an issue. If you use a telephoto lens, for example 200mm, your camera’s chosen shutter speed may become borderline in overcast weather.
Things become more complicated in these types of photography in three situations:
- When the light drops, especially around sunrise and sunset
- When you use a long focal length
- When you shoot night photos
In the three cases above, the problem is the same: you lack light, and you quickly risk camera shake or motion blur. To compensate for this loss of brightness, you can:
- Increase the ISO (from ISO 100 to 200, or even 800 on larger sensors),
- Open the aperture (for example, move from f/11 to f/8 or f/5.6 on smaller sensors),
- Use a tripod or place the camera on a stable surface.
To put it simply, as soon as light conditions become more difficult (sunrise, sunset or night), you will need to adapt your camera settings, either by increasing ISO (watch out for noise) or by opening the aperture (less depth of field, meaning your photo may not be sharp everywhere).
To avoid making those compromises, you can choose the third option and use a tripod to keep the settings you want for the scene. That is why you see so many landscape photographers with tripods at sunrise and sunset: they want to keep their ideal settings. Want to learn more about landscape photography?
Summary: Static subjects
Settings
- ISO: as low as possible (100 or 200)
- Mode: Av / A
- Shutter speed: 1/20s or faster, depending on the conditions; whatever you need when using a tripod
- Aperture: small (f/8 to f/16)
- Focal length: usually short (wide-angle or ultra-wide-angle)


Example of a wide-angle lens for Canon APS-C DSLRs, ideal for landscape photography – More details on Amazon

An ND filter (neutral density filter) is essential for long exposure photography – More details on Amazon
Recommended camera gear for landscape and architectural photography
- Standard camera body for shooting in the middle of the day
- Lenses: wide-angle and ultra-wide-angle lenses
As for lenses for this type of photography, you can find them at all prices and from all brands. I suggest a summary table of the wide-angle and ultra-wide-angle lenses I recommend.
| Lens | Mount | Sensor | Type | Best price |
|---|---|---|---|---|
| Canon RF 14-35mm f/4 L IS USM | Canon RF | Full Frame | Ultra wide-angle zoom | Amazon / B&H |
| Canon RF 15-30mm f/4.5-6.3 IS STM | Canon RF | Full Frame | Ultra wide-angle zoom | Amazon / B&H |
| Canon RF-S 10-18mm f/4.5-6.3 IS STM | Canon RF-S | APS-C | Wide-angle zoom | Amazon / B&H |
| Canon RF-S 14-30mm f/4-6.3 IS STM PZ | Canon RF-S | APS-C | Wide-angle zoom | Amazon / B&H |
| Nikon Z 14-24mm f/2.8 S | Nikon Z | Full Frame | Ultra wide-angle zoom | Amazon / B&H |
| Nikon Z 14-30mm f/4 S | Nikon Z | Full Frame | Ultra wide-angle zoom | Amazon / B&H |
| Nikon Z DX 12-28mm f/3.5-5.6 PZ VR | Nikon Z DX | APS-C | Wide-angle zoom | Amazon / B&H |
| Sigma 16mm f/1.4 DC DN Contemporary Z | Nikon Z DX | APS-C | Wide-angle prime | Amazon / B&H |
| Fujifilm XF 8mm f/3.5 R WR | Fujifilm X | APS-C | Ultra wide-angle prime | Amazon / B&H |
| Fujifilm XF 8-16mm f/2.8 R LM WR | Fujifilm X | APS-C | Ultra wide-angle zoom | Amazon / B&H |
| Fujifilm XF 10-24mm f/4 R OIS WR | Fujifilm X | APS-C | Ultra wide-angle zoom | Amazon / B&H |
| Fujifilm XF 14mm f/2.8 R | Fujifilm X | APS-C | Ultra wide-angle prime | Amazon / B&H |
- Tripod: useful only in low light, at sunset, at night, or for daytime long exposures with ND filters. You’ll find a very good selection here, to choose according to the weight of your gear. You can also have a look at my dedicated article in the “everything for photography” category.
- Filters:
- For long exposure, consider an ND400 or ND1000 in the middle of the day. At the end of the day, an ND64 is ideal in my opinion, as it avoids excessively long exposures.
- Polarizing filter: essential for contrast and saturation. My preference is this Hoya filter.
- GND filters + filter holder: perfect for balancing the brightness of a scene while shooting. For sunrise and sunset, I recommend a GND 16 or 32 filter (hard or soft, depending on your scene). Don’t forget a reverse filter too, which is well suited to sunsets and sunrises.
Books
- The Landscape Photography Book: The step-by-step techniques you need to capture breathtaking landscape photos like the pros
- Mastering Long Exposure: The Definitive Guide for Photographers
- Photography: Night Sky: A Field Guide for Shooting after Dark
Moving subjects (portraits, wildlife and sports)
Second category of subjects: moving subjects. As with static subjects, I have grouped together several fields whose settings are fairly similar. Portraits are a bit different because they do involve moving subjects, but they are usually much slower than wildlife, cars or planes.
In most cases for moving subjects, you will be advised to use S mode (or Tv on Canon), meaning shutter priority. I recommend setting the shutter speed you want (say 1/1000s, for example), setting ISO to automatic, and in most cases the camera will shoot at the widest available aperture (the smallest “f/” number), which should suit you because you usually want to isolate your subject from the background.
For wildlife that is not moving much, I often use Av / A mode (aperture priority). This lets me choose the aperture (usually as wide as possible), set ISO to auto, and then check what shutter speed the camera gives me. If the animal is still, even with a long focal length, this may be enough. If you feel it is not, you can always switch ISO to manual and raise it, doubling the value to gain another stop of shutter speed.

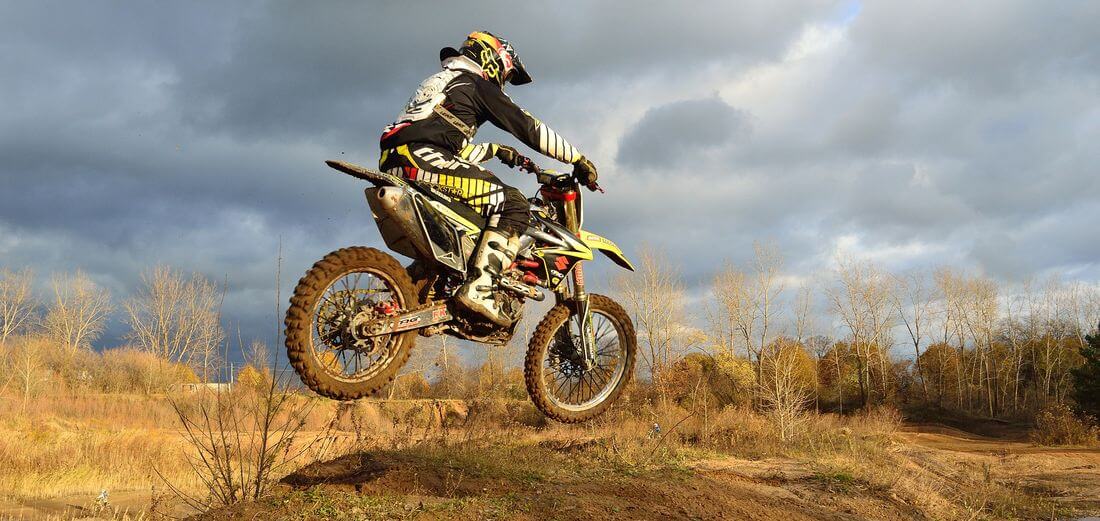

Generally speaking, for these types of subjects (people, animals, sports), the main goal is to freeze the subject as effectively as possible and isolate it from the background, especially in portraits. Regarding camera settings, here is what you should remember:
- We will often use a wide aperture (for example, f/1.4 to f/2.8), which reduces exposure time and depth of field. This gives you a sharp subject with a blurred background. Be careful in portrait photography, or when photographing animals up close, not to open the aperture too much, otherwise you may see a difference in sharpness between the eyes and the rest of the head (unless that is the effect you want). For distant subjects, such as sports or animals at a distance, this will not be a problem. If you are indoors (for example, handball, volleyball, etc.), the lack of light will push you to shoot wide open, at your lens’s maximum aperture, and often to increase ISO. Obviously, at night, you will also have no choice but to open your aperture as wide as possible to gain shutter speed.
- Regarding ISO, everything depends on your subject and the amount of light in the scene. In portrait photography, the subject usually moves less, so there is less need to raise ISO. For other subjects, such as sports or wildlife, movement is often very fast, so your camera needs to capture the scene quickly. For that reason, raising ISO will often be necessary, less so in broad daylight, but especially in low light or indoors. Along with using a wide aperture, this will often be almost unavoidable. Very often, ISO 400 to 800 will become your everyday range, and ISO 1600/3200 may be needed as soon as light starts to fade and you have already opened your aperture as wide as possible. Would you like to learn more about night photography by the way?
- Regarding focal length, telephoto lenses are often used: between 70mm and 200mm on full frame, and between 50mm and 150mm on APS-C for portraits. A long focal length also helps isolate the background more easily, allowing your subject to stand out. For environmental portraits or group photos, you can use shorter focal lengths, between 28mm and 50mm on full frame, or between 24mm and 35mm on APS-C. For wildlife and sports, focal lengths of 300mm, 400mm or even more are common. You need to pay particular attention when using long focal lengths. Always keep a sufficient shutter speed according to your focal length (1x to 2x the focal length). If your lens is stabilized, which is often the case with long focal lengths, you will have more flexibility as long as the subject is relatively slow.
Summary: Moving subjects
Settings
- ISO: raise it as needed for portraits; often necessary for sports/wildlife (ISO 400/800 and higher indoors or in low light)
- Mode: Av for slower subjects, Tv for fast subjects, or M mode
- Shutter speed: around 1/90s or faster depending on the subject for portraits, and adapted to the subject for sports and wildlife (1/300s to 1/500s, or even faster depending on the subject)
- Aperture: wide (for example, f/1.2 to f/2.8)
- Focal length: long (telephoto lens)


The Tamron 100-400mm, a beautiful lens for wildlife without breaking the bank – More details on Amazon
Camera gear for moving subjects
- Body: entry-level/mid-range for portraits; higher-end with good autofocus for wildlife and sports
- Portrait lens: once again, there is something for every budget. We have summarized all our recommendations in the sortable table below.
| Lens | Mount | Type | Best Price |
|---|---|---|---|
| Canon RF 24-70mm f/2.8L IS USM | Full Frame | Standard zoom | Amazon / B&H |
| Canon RF 28-70mm f/2L USM | Full Frame | Standard zoom | Amazon / B&H |
| Canon RF 50mm f/1.8 STM | Full Frame | Standard prime | Amazon / B&H |
| Canon RF 85mm f/2 Macro IS STM | Full Frame | Telephoto/Macro prime | Amazon / B&H |
| Canon RF 70-200mm f/2.8 L IS USM | Full Frame | Telephoto zoom | Amazon / B&H |
| Sigma 18-50mm f/2.8 DC DN Contemporary RF-S | APS-C | Standard zoom | Amazon / B&H |
| Nikon Z 50mm f/1.4 | Full Frame | Standard prime | Amazon / B&H |
| Nikon Z 85mm f/1.8 S | Full Frame | Telephoto prime | Amazon / B&H |
| Nikon Z 70-200mm f/2.8 S VR | Full Frame | Telephoto zoom | Amazon / B&H |
| Fujifilm XF 56mm f/1.2 R WR | APS-C | Telephoto prime | Amazon / B&H |
| Fujifilm XF 90mm f/2 R LM WR | APS-C | Telephoto prime | Amazon / B&H |
| Fujifilm XF 50-140mm f/2.8 R LM OIS WR | APS-C | Telephoto zoom | Amazon / B&H |
- Lens for wildlife/sport: there are plenty of options at almost every price point. Once again, here are some solid references.
| Lens | Mount | Focal length | Max. aperture | Ø filter | Weight | Best Price |
|---|---|---|---|---|---|---|
| Canon RF 100-300mm f/2.8 L IS USM | Full Frame | 100-300mm | f/2.8 | Rear | 2590g | Amazon / B&H |
| Canon RF 100-400mm f/5.6-8 IS USM | Full Frame | 100-400mm | f/5.6-8 | 67mm | 635g | Amazon / B&H |
| Canon RF 100-500mm f/4.5-7.1 L IS USM | Full Frame | 100-500mm | f/4.5-7.1 | 77mm | 1365g | Amazon / B&H |
| Nikon Z 100-400mm f/4.5-5.6 VR S | Full Frame | 100-400mm | f/4.5-5.6 | 77mm | 1435g | Amazon / B&H |
| Nikon Z 180-600mm f/5.6-6.3 VR | Full Frame | 180-600mm | f/5.6-6.3 | 95mm | 1995g | Amazon / B&H |
| Nikon Z 800mm f/6.3 VR S | Full Frame | 800mm | f/6.3 | 46mm | 2385g | Amazon / B&H |
| Fujifilm XF 70-300mm f/4-5.6 R LM OIS WR | APS-C | 70-300mm | f/4-5.6 | 67mm | 588g | Amazon / B&H |
| Fujifilm XF 100-400mm f/4.5-5.6 R LM OIS WR | APS-C | 100-400mm | f/4.5-5.6 | 77mm | 1375g | Amazon / B&H |
| Fujifilm XF 150-600mm f/5.6-8 R LM OIS WR | APS-C | 150-600mm | f/5.6-8 | 82mm | 1605g | Amazon / B&H |
| Sony FE 100-400mm f/4.5-5.6 GM OSS | Full Frame | 100-400mm | f/4.5-5.6 | 77mm | 1395g | Amazon / B&H |
| Sony FE 200-600mm f/5.6-6.3 G OSS | Full Frame | 200-600mm | f/5.6-6.3 | 95mm | 2115g | Amazon / B&H |
| Sony FE 400-800mm f/6.3-8 G OSS | Full Frame | 400-800mm | f/6.3-8 | 105mm | 2470g | Amazon / B&H |
Books
- Wildlife Photography: An expert guide
Waterfall photography
As it happens, this is a field I practice quite a lot, especially when traveling, and one I’m really passionate about. I also wrote a full article about waterfall pictures, so feel free to read it if you want to know more, especially for practical tips.
Regarding settings for this type of photo, generally speaking, you’ll need:
- A short focal length, usually a wide-angle lens (though not always),
- A small aperture (for example, f/11),
- ISO at its lowest setting.
The idea is to get as much depth of field as possible around the waterfall and to create a sense of scale with a wide-angle lens. ISO is kept low to limit the appearance of digital noise. In some specific cases, a wide aperture could be used to blur elements in the foreground (foliage, for example), but in my opinion this will remain quite rare.
Very often, for this type of picture, it is recommended to slow down the exposure time to create a sense of movement in the waterfall. This is a perfect opportunity to learn long exposure. You have probably already seen those pictures of waterfalls or seascapes with a milky, flowing effect. This is simply caused by a much slower exposure time than usual.
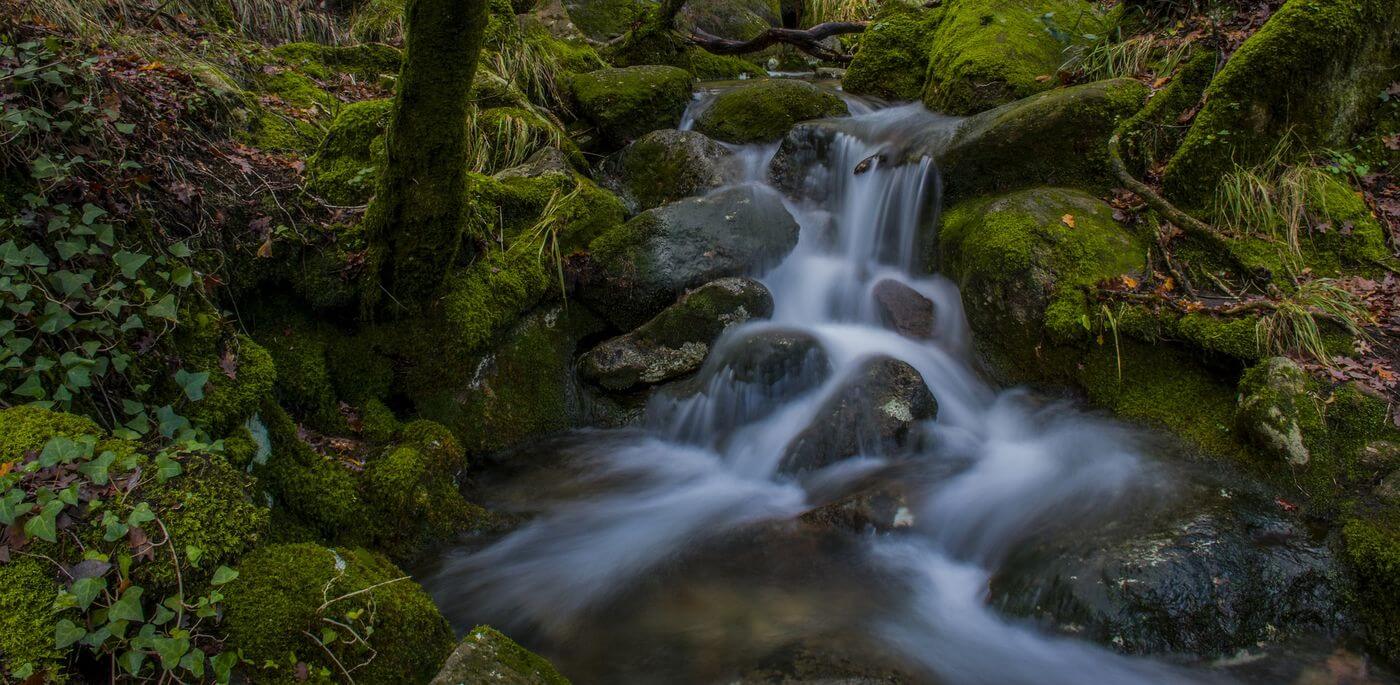
It all depends on the time of day when you want to photograph the waterfall. In the middle of the day, if you want to achieve that motion effect, it will be impossible without a neutral density (ND) filter. As soon as the light fades (sunrise, sunset, undergrowth), you can start making long exposures without an ND filter. After that, everything depends on the exposure time and the effect you want to achieve. At night, of course, no filter is needed. The only downside is that you need a tripod to shoot long exposures.
For shutter speed, you’ll start getting motion effects below around 1/10s, with increasingly pronounced effects from around 1 second of exposure. For a fully milky effect, you’ll often need exposure times of around 10 to 30 seconds.
I mentioned focal length, and it’s true that we usually use a short focal length in most cases. But it is also useful to stay flexible with a standard 18-55mm lens on APS-C or a 24-70mm on full frame. Of course, and I recommend it, you can always move around the waterfall to find the best angle, but this can sometimes be tricky. Being able to zoom in will often make things easier.
Summary: Waterfall photography
Settings
- ISO: as low as possible
- Mode: Av or M
- Shutter speed: from 1/10s to several seconds, depending on how strong you want the effect to be
- Aperture: small (f/8 to f/16)
- Focal length: short (wide-angle and ultra-wide-angle), or a standard zoom for more flexibility
Equipment for waterfall photography
- Body: an entry-level body will do the job very well.
- Lenses: see the list for landscape photography.
- Tripod: mandatory -> Your choice should be adapted to the weight of your camera gear. Ideally, leave yourself some margin. If your camera body + lens weighs 2kg, I recommend choosing a tripod that can support 4kg (2x the load).
That’s it, I’m coming to the end of this long article explaining which camera settings you can use in different real-life situations. Nothing is set in stone, and nothing will ever be quite that simple. Keep in mind that these are recommendations, decision aids to help you choose your settings. Of course, you will need to adapt everything to your photographic equipment, which will often depend on your budget. I deliberately did not talk about settings for macro photography, which is a very specific field. I will cover that point in a dedicated article. I hope I have been clear enough and that some points are starting to make sense! If you want to go further, I invite you to read the photo tips and techniques I share on the blog.
In the meantime, I wish you a good photography learning journey!
See you soon,

Written by Sylvain PONS
I've been passionate about photography since 2010, learning as I went along. Today, I dedicate myself to guiding others in their choice of camera gear and sharing a variety of tips to improve their photography skills.
Despite our care, a mistake may have slipped into this article. If you find any, please don't hesitate to let us know so we can correct it as soon as possible and keep our information up-to-date!