How to use an ND filter for long exposure photography?
Last update: 06/23/2026
Our blog continues to grow thanks to you, our readers. This post may contain affiliate links, which means we can earn a small commission if you make a purchase through them, at no extra cost to you. This helps us to continue to bring you more and support our work!
Most photographers agree that long exposures can significantly improve your images, especially in landscape photography. This article complements another guide where I explain how to take a long exposure photo and the techniques involved. Depending on the shooting conditions, using an ND filter may be essential. Here, I’ll explain in detail how to use an ND filter for long exposure photography. I’m deliberately leaving variable ND filters aside in this article.
I personally consider the ND filter one of the photo accessories you need if you want to create beautiful outdoor images. It is perfect for landscape photographers who want to enhance their photos with a long exposure effect, for example on a waterfall in broad daylight.

Quick reminder: what is an ND filter?
This article complements the two complete guides on ND filters that I have already written:
- What is the purpose of an ND filter in photography?
- Which ND filters to choose and how to make this choice?
To put it simply, an ND filter reduces the amount of light reaching your camera sensor thanks to its opacity, or, more casually, its “darkness.” This lets you use a slower shutter speed for the same shooting conditions. The more opaque your filter is, the slower your shutter speed will be. The principle itself is therefore quite simple.


When should you use an ND filter for long exposure?
To use an ND filter properly, you first need to know when it is useful for long exposure photography. This mainly depends on two things:
- The shooting conditions,
- The strength of the long exposure effect you want to create.
Regarding the shooting conditions, an ND filter is necessary for long exposure photography in the middle of the day in most cases. Because the light is too strong, you need to reduce the exposure using a high-density ND filter, usually between ND400 and ND1000. If you still don’t know how to choose an ND filter, I invite you to read my detailed article on the subject.

In low-light conditions such as sunrise or sunset, it is possible that, even with optimal camera settings, the long exposure effect will not be strong enough in your image. Depending on the brightness, an exposure of half a second or even one second may be possible. However, that may not be enough to create a really blurred effect in the scene. In this specific case, you have two options: use either a low-density or high-density ND filter, depending on the effect you want.
Note that if you want to take a long exposure photo at night, you usually do not need an ND filter. A tripod will be enough.
How to use an ND filter: the basic method
From a technical point of view, long exposure takes a little practice, but over time, using an ND filter becomes almost second nature. The basic method is always the same:
- Find the subject you want to photograph,
- Set up your camera on a tripod to avoid camera shake,
- Compose your image carefully and remove your lens hood,
- Enable mirror lock-up if your camera has this option,
- Turn off lens stabilization to avoid unwanted movement from the stabilizer,
- Cover your viewfinder to prevent stray light from entering,
- Switch your camera to remote control mode,
- Choose aperture priority mode: Av on Canon cameras and A on Nikon cameras.


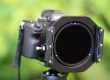
A tripod is essential for taking long exposure photos with an ND filter
The process above is the same regardless of the shooting conditions, whether during the day or at night, and regardless of the ND filter density you use.
Using a low-density ND filter for long exposure
When I talk about low-density ND filters, I mean filters up to a 6-stop light reduction, or ND64. So why set the limit there? Beyond ND64, the filter is often too dense for some cameras to focus properly with autofocus. It simply does not let enough light through. In that case, you need to focus before installing the filter, then add the filter afterwards. This is what you will usually do with high-density filters.
Using a low-density ND filter for long exposure is fairly simple. The process is almost identical whether you use square filters with a filter holder or screw-in ND filters. To understand how to take a long exposure with this type of filter, keep one simple thing in mind: low-density ND filters are not completely opaque. In most cases, the camera sensor can still focus on the scene.
All you have to do is follow the steps above: find your location, use your tripod because handheld shooting will not work, compose carefully, prepare your camera for long exposure photography, choose your settings, and focus, usually with autofocus. I recommend then turning autofocus off and switching to manual focus, so the camera does not refocus elsewhere when you trigger the shot remotely. Once everything is ready, all you have to do is release the shutter with the remote control and make sure your ND filter is properly positioned, whether it is a screw-in filter or a filter mounted on a holder. You can either place the ND filter on the lens from the start or add it at the last moment after focusing.
Let the camera take the photo. In Av or A mode, it will automatically calculate the required exposure time based on the filter density. After the photo is taken, some processing time may be required during long exposures, often roughly twice the exposure time if long exposure noise reduction is enabled. Once the result appears, check the exposure and adjust if necessary.

Be careful: even if your camera can focus with an ND64 filter, which is the case with my camera and a B+W 106 filter, it may still display an exposure time longer than 30 seconds if the scene is too dark. You can check the shutter speed selected by the camera by pressing the shutter button halfway down. If the announced shutter speed is longer than 30 seconds, you can use another technique, the same one used for long exposure photography with high-density filters. I explain it in the next section.
It is also possible to take long exposure photos with a circular polarizing filter, or CPL, but this requires a little more practice. Be especially careful with wide-angle or ultra-wide-angle lenses, as vignetting may occur because of filter thickness. This problem obviously does not occur with a telephoto lens or a longer fixed focal length, such as 100mm, because the angle of view is much narrower.
Using a high-density ND filter for long exposure (ND400 and above)
When using a high-density ND filter for long exposure, you need a slightly different technique. Unlike low-density filters, the camera can no longer focus through the filter because it is too opaque. The beginning of the process is identical to the low-density method explained above: choose your subject, compose the image, set up the tripod, prepare your long exposure settings, and choose your camera settings. Once you’re ready, follow this procedure:
1 – In aperture priority mode, Av on Canon cameras, focus on the scene without the filter. Some photographers prefer to take a test shot without the filter to check whether the camera’s exposure metering in aperture priority mode is correct,
2 – Check the exposure, using the histogram for example. You may need to adjust it,
3 – Once the image is correctly exposed, write down the shutter speed given by the camera,
4 – Lock the focus by switching your lens or camera to manual focus,
5 – Install the ND filter on your lens,
A quick aside
There are two types of ND filters: screw-in ND filters, which are circular, and square or rectangular ND filters used with filter holders. If you want to know the advantages and disadvantages of each, you can refer to my article.
- If you use an ND screw filter, simply screw it onto the front of your lens as carefully as possible,
- If you use an ND filter with a filter holder, I recommend first placing the ND filter in your filter holder, in the slot closest to the camera body. This way, all you need to do is screw the adapter ring onto your lens and attach the filter holder to it. Ideally, you can install the adapter ring at the beginning to avoid extra movement on the tripod. This is one of the reasons why I prefer filter holders to screw-in filters. Alternatively, you can mount the adapter ring for the filter holder in step 1, then attach the empty filter holder ready to receive the filter. From there, you can start step 1. That is what I often do.
In any case, try to make as few movements as possible on the tripod when installing your filter. Since the focus has already been set, moving the tripod may shift the focus and result in a blurry image.
Let’s go back to the technique.
6 – At this stage, you need to make a small calculation to adapt the shutter speed to the density of your filter. I recommend either using a dedicated app for the calculation or creating your own table showing shutter speed equivalents with and without the filter.
The principle is simple: you need to compensate for the loss of light caused by the filter. To do that, you must adjust your shutter speed. In practice, the shutter speed given by the camera without the filter must be multiplied by the attenuation factor of the filter, meaning the number after “ND.” Yes, it may sound like a headache, but it is actually simple. And as I’ve already mentioned, you do not need to do these calculations yourself, since there are very good apps and ready-made tables for this.
Example:
Exposure time without filter: 1/4 s
With an ND1000 filter: 1/4 × 1000 = 250 s, or about 4 minutes, since 250/60 = 4.16
Pretty simple, isn’t it?
7 – Thanks to the calculation, you now know which shutter speed to choose on your camera with the filter in place,
8 – Switch your camera to manual mode (M), keep the initial settings used without the filter, namely aperture and ISO, and adjust the shutter speed to the value calculated for the ND filter,
- If the calculated shutter speed is less than 30 seconds, set that shutter speed with the filter in place and simply trigger the shot,
- If it is longer than 30 seconds, turn the dial up to 30 seconds. You will then see B mode, or Bulb mode, appear. This mode simply means that you set the shutter speed yourself. Depending on your camera, Bulb mode is available by selecting a shutter speed beyond 30 seconds, or, as on Canon cameras, as a separate mode selected with the main camera dial.
9 – All you have to do is take your photo with the remote control and stop the exposure once you reach the shutter speed calculated earlier,
10 – Last step: check the exposure and sharpness of your image. If necessary, adjust the shutter speed, making it shorter or longer depending on the result. For example, if the image is too bright, reduce the exposure time to avoid overexposure.

Example of a photo taken with a high-density ND filter by the sea, showing the typical milky effect
As a reminder, if you want to learn how to take long exposure photos, you will also need to master a bit of post-processing. Your images may need white balance corrections, as the final result can sometimes have a bluish or purple color cast. Fortunately, this remains very manageable in post-production.
I hope this article has helped you understand how to use an ND filter for long exposure photography, in different conditions and depending on filter opacity. In my opinion, the ND filter is an essential camera lens filter, along with the polarizing filter, if you want to improve your landscape photography. Does this technique seem difficult to you? Have you ever tried long exposure photography? If you want to learn more, here is our complete review of Kolari ND filters, a brand that, to my knowledge, offers some of the best ND filters available!
You may also be looking for ways to use a polarizing filter, right?
See you soon,

Written by Sylvain PONS
I've been passionate about photography since 2010, learning as I went along. Today, I dedicate myself to guiding others in their choice of camera gear and sharing a variety of tips to improve their photography skills.
Despite our care, a mistake may have slipped into this article. If you find any, please don't hesitate to let us know so we can correct it as soon as possible and keep our information up-to-date!