How to use a circular polarizing filter
Last update: 06/23/2026
Our blog continues to grow thanks to you, our readers. This post may contain affiliate links, which means we can earn a small commission if you make a purchase through them, at no extra cost to you. This helps us to continue to bring you more and support our work!
After explaining in detail what a circular polarizing filter (CPL) is useful for, and how to choose a polarizing filter, you may have decided to buy the famous filter. I hope you made the right choice! But buying a polarizing filter is not enough: you still need to know how to use it. To master this camera lens filter, you need a little technique and practice. In this article, I’ll explain how to use a circular polarizing filter. In practice, this is the type of polarizing filter most photographers use. As for me, it never leaves my camera bag.
Without a filter, some midday shots can look very flat. A polarizing filter helps bring out colors by increasing saturation and contrast. That is its main purpose. In my opinion, it is one of the essential photo accessories for taking better-quality images, especially in landscape photography. It helps reduce harsh reflections and soften overly bright light.
As I mentioned in the previous articles, I therefore recommend not skimping too much on the quality of your filter. A poor-quality filter will affect the rendering of your images. If you want to learn landscape photography properly, this is one of the filters I think you should own, along with an ND filter.
Also keep in mind the few drawbacks of using a polarizing filter: vignetting on very wide-angle lenses, the price of large-diameter filters (above 77 mm), and the slight loss of light caused by the filter, which can darken the blue sky, for example. Remember as well that you can buy an adapter ring to avoid buying several filters for the smaller diameters of your lenses.
The technique: how to shoot with a circular polarizing filter
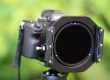
I’m not going to make things more complicated than they really are. The system, basic principle, and operation of a circular polarizing filter are fairly simple. One part stays fixed and attached to the lens, while the other part can rotate. All you have to do is screw the fixed part onto the front thread of your lens. Very often, you will need to remove the lens hood to do this properly.


Then you simply rotate the moving part of the filter to vary the polarization effect, depending on the scene you are photographing. In other words, by turning the front ring, you can adjust how strong the effect appears. Just be careful not to overdo it: colors can quickly become over-saturated and look less realistic.
Also pay attention to the direction in which you turn the filter. If you rotate it the wrong way, you may gradually unscrew it, and it can eventually come loose or even fall. You don’t always notice it at first, and yes, it has happened to me several times!
When should you use a polarizing filter?
This is one of the factors to keep in mind when learning how to use a circular polarizing filter. In general, the higher the sun is in the sky, the less visible the polarizing effect may be in your photos. The result also depends heavily on your position in relation to the sun. Conversely, the effect is often easier to see when the sun is lower.
To sum up:
- The polarizing effect is often excellent at sunrise and during the hours that follow,
- It can also be very useful a few hours before sunset and around the “blue hour”.
These times correspond to what photographers often call the “golden hours”. They are among the best moments for landscape photography and, of course, a perfect way to improve your travel photos. They are also ideal for capturing beautiful, soft light.
Your position in relation to the sun
In addition to the time of day, the other key element to consider is your position in relation to the sun. To get the best effect from a polarizing filter, you generally need to shoot with the sun roughly at a 90° angle to your lens.

So keep in mind that polarization is very effective when the sun is to one side. Don’t expect strong polarizing effects when shooting directly into the light, of course. This is especially true on the sea and lagoons here in French Polynesia. To reduce reflections, a CPL filter is perfect.
The focal length you use
You should also pay close attention to the focal length you use with your polarizing filter. If you are not familiar with focal length, it is the number written in millimeters on your lens (e.g. 18 mm, 24 mm, 70 mm, 100 mm, 200 mm, 300 mm, and so on). This is an important point if you want to understand how a circular polarizing filter behaves.
I already briefly explained this in the article “What is the purpose of a polarizing filter?” The shorter your focal length (with a wide-angle or ultra-wide-angle lens, for example at 16 mm), the more careful you need to be with the polarization effect in your image, and therefore with your position in relation to the sun.

This is particularly visible in scenes with large blue skies, such as seaside or mountain viewpoints. A wide-angle lens captures a very broad field of view, so if you position yourself poorly in relation to the sun, you may get uneven polarization across the image. The edges of the frame may not be polarized in the same way as the center, and the difference can become visible.
My advice is to do a few tests while changing your angle in relation to the sun. If the effect is still too strong, don’t hesitate to rotate the ring to reduce the polarization. Natural light can sometimes be so intense that it becomes difficult to tone down the polarizing effect completely.
What format are you shooting in: landscape or portrait?
One last technical point: if you switch from landscape to portrait orientation, the polarization effect will change. Be careful to readjust your polarizer whenever you change shooting format. With a circular polarizing filter, you need to rotate the filter ring again to polarize the scene properly.
Note that if you use a filter holder with your polarizing filter, as I do on my Canon 24-70 mm lens, you can simply rotate the filter holder by 90° in relation to the sun. This avoids having to touch the filter ring itself.

Exposure compensation
If you are a beginner in photography, you may not be familiar with this term yet. Exposure compensation means using your camera settings to correct the brightness of a scene. Your camera’s sensor may not always assess the light correctly and may tend to overexpose or underexpose the image.
This can happen when using a polarizing filter, especially in landscape photography. Since the filter absorbs some of the light, you may need to compensate for that loss of brightness. Depending on your camera body and filter, a correction of around +1 to +2 EV may be necessary to expose the scene properly.
What I personally use
I wanted to share the references I personally use for landscape photography.
- For my Canon 70-300 L IS zoom, I use this 67 mm polarizing filter. I’m very happy with it because it is smooth, slim, and easy to use,
- For my Canon 24-70 L f/2.8, I use the Lee 105 mm Landscape Polarizer combined with a filter holder system from the same brand. I use this polarizing filter together with a 0.9 Soft Edge graduated neutral density filter (GND), which is perfect for balancing bright skies with a darker foreground.
Here are the two polarizing filters I currently use on a daily basis for my photos.


Lee 105 mm circular polarizing filter, Slim version II: a high-quality polarizing filter with a slightly warm color rendering. It works wonders on my lagoons!
That’s it for this article. I hope you now have a better idea of how to use a circular polarizing filter. My final piece of advice is simply to test it. You don’t need a photo workshop or professional-level skills to get started! Take a few pictures with your filter, vary the degree of polarization, and find the setting that works best for your scene. If you like filters, I invite you to read the article on how to use an ND filter.
If you have any technical questions about how to use it, feel free to leave me a comment at the bottom of the article.
Did you like the article? Don’t hesitate to share it on your social networks!

Written by Sylvain PONS
I've been passionate about photography since 2010, learning as I went along. Today, I dedicate myself to guiding others in their choice of camera gear and sharing a variety of tips to improve their photography skills.
Despite our care, a mistake may have slipped into this article. If you find any, please don't hesitate to let us know so we can correct it as soon as possible and keep our information up-to-date!