KASE K9 filter holder review
Last update: 06/23/2026
Our blog continues to grow thanks to you, our readers. This post may contain affiliate links, which means we can earn a small commission if you make a purchase through them, at no extra cost to you. This helps us to continue to bring you more and support our work!
Anyone who follows our blog knows that a big part of it is dedicated to photography, a passion Melanie and I share. For more than three years now, we’ve been writing about photography and trying to help beginners as much as possible: understanding the basics, getting practical tips, improving in specific areas, choosing camera gear, and selecting the right photo accessories.
And if there’s one area I’m especially passionate about, it’s accessories—especially camera lens filters. The link above gives you an overview of all the filters I consider really useful in photography: polarizing filters, ND filters (short for Neutral Density), and GND filters (Graduated Neutral Density). I’m one of those people who would much rather spend time shooting than sitting behind a computer trying to recreate what I saw in the field!
A few months ago, while I was writing a full article on special filter holder systems for wide-angle lenses (which I need to update, by the way), I took the initiative to contact several camera lens filter brands to explore a potential partnership. KASE, the Chinese filter brand, got back to me positively! I’d had the idea of testing camera gear for quite some time, so I’m really happy this first partnership is taking shape—especially around camera lens filters!


So it was a real pleasure to test a set of filters and a filter holder from KASE. They kindly sent me a package so I could share my opinion on the quality of their camera accessories. This was especially interesting for me because I’d been using the Lee system for several years. It works well, but it’s still bulky and, now that I’ve seen what other brands are doing, clearly less convenient in everyday use. As always on this blog, I’m saying right from the start that this is a partnership, but I remain fully in control of what I write and of my opinion on the subject.
I apologize for the time it took me to write this article. Between the trip to France, the return to French Polynesia, and the two Covid-19 lockdowns, things were not exactly simple. I can finally take the time to catch up, with the added bonus of an excellent week in the Gambier Islands, my little corner of French Polynesian paradise!
New Kase K9 filter holder and the filters tested with it
Below, I’ll show you all the gear I had the chance to test: first the accessories sent by KASE, then the K9 filter holder itself, and finally a field test of the filters, along with my own impressions.
Gear sent for the test
Let’s start with the basics. What did I receive from KASE to test? They were kind enough to let me choose what seemed most useful for my own photography, so here’s what I picked:


In short, I chose this kit because it includes the essentials I need for the way I shoot. I’m going to have a lot of fun with it! Come on, let’s take a closer look.
The KASE K9 filter holder
Product discovery
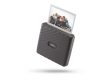
I’m genuinely pleased to discover this beautiful hard protective box containing the KASE K9 filter holder and its accessories. The package was well protected, which is always reassuring when something arrives on the other side of the world without a scratch. Everything is neatly organized, and the presentation immediately feels professional.
The K9 filter holder, placed at the front of the box, is the first thing you see. When you lift the top section, you then discover, in sturdy transparent pouches, a 90mm magnetic CPL polarizing filter, two magnetic adapter rings (called “Magnetic Geared Adapter Rings”) in 77mm and 82mm, used to attach the filter holder magnetically, and simple 67-82mm and 72-82mm step-up rings, allowing the system to be used with lenses that have smaller filter threads. It’s also worth noting that the kit includes assembly tools (a small screwdriver for removing the filter slots) and two additional pairs of slots, so you can stack up to three filters in front of the CPL filter.


View of the K9 100mm filter holder and its beautiful polarizing filter (top). Below, the contents of the kit from left to right: the extra slots, an Allen key, the 77mm and 82mm magnetic adapter rings, and the 67-82mm and 72-82mm step-up rings
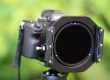
So let’s start with the base: the K9 100mm filter holder system. The advantage of this type of filter holder system, like the Haida M50 or the NISI S5, is that you can use a circular polarizing filter independently from one or more additional filters, such as an ND or GND filter, mounted here in front of the polarizer. This setup also helps limit the diameter of the polarizing filter (my 105mm Lee polarizer cost me a pretty penny) and avoid light leaks behind the polarizing filter.
The filter holder feels very lightweight yet strong. It is made from aluminum, described as aerospace-grade, with a black anodized finish designed to reduce reflections. To me, the whole system clearly feels well made. The filter holder has an adjustment wheel that lets you change its orientation. It is bright red, wide, notched, and falls perfectly under the fingers. By comparison, the wheel on my Lee system is too small.
On the opposite side of the adjustment wheel, there is a geared wheel that, once the magnetic polarizing filter is mounted on the filter holder, lets you adjust the degree of polarization in the image. I already knew about this system because I had done quite a bit of research on different filter holder systems for the article mentioned in the introduction, but I had never had the chance to test it myself. I’ll tell you more about it below, but clearly, the system is well thought out and more practical than manually rotating a polarizing filter.


Detailed view of the filter holder elements: at the top, the side wheel used to rotate the polarizing filter once mounted, as well as the slot that makes it easier to grip the CPL filter. At the bottom, the large wheel on the opposite side, which lets you adjust the angle of the filter holder so it can be used in any position.
Another interesting point: the filter holder comes with two slots already mounted, allowing you to place two filters (ND/GND) in front of the polarizer. There is also black velvet inside the filter holder to minimize stray light, for example when placing an ND filter in the first slot for a long exposure. Last but not least, there are two notches in the filter holder that make it easier to remove the magnetic CPL filter.
By the way, the supplied 90mm circular polarizing filter also appears to be high quality. It is very thin (slim), making it well suited to use on the filter holder with wide-angle lenses. I’ll explain how it works below, but it fits very well on the filter holder.
As for the other accessories supplied, the magnetic adapter rings and step-up rings are also sturdy and very light, just like the filter holder. The magnetic rings (77mm and 82mm) have an external thread that lets you screw them onto the front of the lens. They also include an internal magnetic area to hold the polarizing filter and a notch that, once mounted on the filter holder, lets you vary the polarization effect using the filter holder’s wheel. The step-up rings are basic and lightweight, but they do the job very well (I tried them on smaller-diameter lenses).
In short, I have to say that, for now, I’m really won over by the whole setup. Of course, I’ll see how it performs in use.
For those who are new here and are wondering why you should use a filter holder system rather than a circular screw-in filter, here are the two main reasons:
- First, many wide-angle lenses do not allow the use of conventional screw-in filters because of a curved front element and/or a fixed lens hood. Of course, this also depends on the size of your camera sensor. This is especially true for wide-angle lenses mounted on full-frame DSLRs. Thanks to their smaller size, mirrorless systems are making it easier for manufacturers to release wide-angle lenses that can accept screw-in filters,
- Second, a filter holder system mainly allows you to use several stacked filters. For example, I use my CPL polarizing filter daily, along with a GND filter to reduce brightness in the brighter part of the sky. For long exposures by the sea, I also often use an ND filter, a Reverse GND for the sky, and sometimes a polarizing filter to see “through the water.” In short, without a filter holder, you are usually limited to a single filter, most often a polarizer or an ND filter.
Installation and field use
I had the opportunity to test the “filter holder + polarizing filter” setup for some time in several situations, including daily use over a week in the Gambier archipelago. Here is my feedback, along with everything you need to know about mounting the system and using it in the field.
The principle itself is simple:
1 – First, you need to screw the magnetic adapter ring onto the front of your lens, using the outer thread of the ring, which fits perfectly onto the lens thread. For my tests, I used my Canon 16-35mm f/4 L IS, which has a 77mm filter thread. KASE includes 77mm and 82mm magnetic rings in the kit, two common diameters on wide-angle lenses. If your wide-angle lens has a smaller diameter than 77mm, KASE also provides step-up rings (67-82mm and 72-82mm). To put it simply, if your lens has a filter thread between 67mm and 82mm, you can start shooting right away. If you use a lens with a diameter smaller than 67mm (which is fairly rare, in practice), you’ll just need to buy a step-up ring adapter in the right size for your lens. By the way, I wrote a full article about adapter rings on this blog.
For example, I decided to mount the 67-82mm step-up ring on my Canon 70-300 L IS telephoto lens (67mm Ø), then screw the 82mm magnetic ring onto it to mount the filter holder. Everything works perfectly, and it also lets me use my CPL filter + GND/ND filters on my telephoto lens (big advantage: no need to buy filters in several different diameters).

2 – Once the ring is mounted on the front of your lens, you can place the filter holder onto the magnetic ring. To do this, unscrew the red adjustment wheel (the largest one) so you can attach the filter holder to the ring. Two arrow markings show you how to position it. Once it is in place, tighten it again using the adjustment wheel. In use, if you mainly shoot with the same lens as I do, you can remove the whole setup at once when needed (to store it in your bag, for example). By firmly tightening the filter holder and the magnetic ring together, you can remove the entire setup directly from the front of the lens and screw it back on later if needed. This saves you from having to do everything in two separate steps.

3 – Third step: you can now attach the magnetic CPL polarizing filter to the adapter ring inside the filter holder. There’s nothing very complicated here: just bring the CPL filter close to the ring (with the writing on the filter facing the ring), and you’ll feel the magnetic pull toward the polarizing filter. Make sure the filter is properly centered in the setup.
You’re now ready to use it. You can simply use the red wheel on the side. As you turn it, you’ll see the wheel catch the CPL filter’s knurling and rotate the filter. Then all you have to do is choose the degree of polarization you want for your photo.
4 – The final step is simply to place the desired filter(s) into the filter holder slots. I did quite a few tests with the KASE GND Soft Edge 1.2, which works very well for balancing exposure when the light in the sky is harsh (as is often the case here in the tropics). I often keep only one slot, but you can choose to mount up to three, allowing you to stack three filters. Between us, I don’t think that has much real interest in the field. At most, I often use a CPL filter with an ND filter added on top (to lengthen exposure time for a long exposure, for example) and a GND filter (to reduce brightness in the sky). These filters fit very well into the filter holder slots, even though I would have liked the slots to feel a little more rigid.

It may sound complicated when explained this way, but once you get used to it, setup literally takes less than 15 seconds. In short, after using it for several hours a day during that week, I’m really happy with the whole system. It is very easy and practical to use, and the wheel system for adjusting polarization is a real game changer.
Polarizing, ND, and GND filters
KASE agreed to send me an ND64 filter as well as three GND filters (Reverse, Hard, and Soft) so I could test the whole set. All the filters come in a hard white pouch for full protection. Clearly, this is not just a nice extra—it also gives a real impression of quality.
I was able to test the filters during light rain, and I had no problem at all. The glass filters are completely water-repellent: you only need to wipe off the raindrops with a small cloth, without leaving any dirty marks on the filter. The coating is really excellent.


For those who are not yet familiar with what these filters are used for and how to choose them, I recommend reading these three articles:
- What is the purpose of a polarizing filter?
- What is an ND filter used for?
- How to choose and use GND filters
I decided not to provide a detailed test of each filter individually in this article, as that would ultimately be of limited interest. I had the chance to test all of them, but especially the magnetic CPL filter, the GND Soft Edge 1.2 / GND Hard Edge 0.6 filter, and the ND64 filter. What I want to give you here are my overall impressions of the filters’ quality.
Overall, the filters are genuinely very good. I did not notice any loss of quality when using the KASE filters. As for the 90mm CPL polarizing filter, I used it on about 500 photos, and the result was really good. Colors and contrast are clearly improved, and the results are excellent. In comparison, the color rendering appears a little cooler than with my Lee filter, but that is simply due to the “Landscape” treatment of the Lee filter, which naturally warms up the colors in the photo when shooting.
Here are a few examples of photos taken on a tripod, to keep exactly the same composition, with and without the polarizing filter. The difference on Polynesian lagoons is excellent. As for the GND Soft 1.2 filter, it is fairly easy to use and, thanks to the gradient on the upper part of the filter, lets you control how much darkness you want to place over the sky while shooting. The result is good, and the camera really recovers detail in the sky thanks to the well-positioned filter. Contrast and saturation in the sky are much better, and the overall look of the image is more balanced. It can sometimes be subtle when the light difference between parts of the scene is not very strong, but when it is, the difference is huge. Below are two examples: without CPL and GND Soft filter / with CPL and GND Soft filter.


As you can see in the two pictures above, shooting with a polarizing filter really changes the game, especially on lagoons. The difference is clear and, even though the clouds moved between the two shots, you can see the increase in color saturation and contrast. Greens and blues are much richer, and the turquoise color of the lagoon really comes through. Also note the detail in the clouds and sky, brought out by the additional use of a GND Soft filter on the sky in this photo.


Here is another example with a pontoon boat. Of course, the pontoon moved slightly between the two shots, but we can clearly see the difference between the two pictures. You can also notice the recovered detail in the top-left corner of the image when shooting with the Soft filter.
In my daily use here, mainly on seascapes, I mostly use the GND Soft 1.2 filter. The GND Hard Edge 0.6 filter is more complicated to use because it requires specific conditions, with a very pronounced difference between the foreground (darker) and a very bright sky (something you often find at the end of the day, for example). Of course, this also means having a landscape in front of you with a perfectly even horizon line and no elements disrupting the composition, typically a seascape. I had to try several times to find the right conditions, but I finally managed one late afternoon while we were doing a small family photo shoot in the Vaipahi garden, here on the island of Tahiti. I got a few shots that clearly speak for themselves, with and without the filter, all taken on a tripod. Just look at the difference and the detail I managed to recover in the sky with the filter.


That late afternoon, the light in the sky was really harsh and the location was nice, so I was able to give it a try. In the picture above, I also had the CPL filter mounted. As you can see, using a GND Hard Edge 0.6 filter is really useful in this situation. The dark part of the filter blocks the bright incoming light perfectly, and the camera sensor manages to expose the scene correctly. Without the filter, that would have been almost impossible. If I exposed for the (darker) sea, the sky was completely overexposed without the filter. If I exposed for the bright sky, the whole foreground (the sea) became very underexposed. In short, the Hard GND filter is perfect for me. I didn’t notice any change in sharpness in the picture, even when zoomed to 100% in Lightroom or DXO. Note that I processed both photos with exactly the same settings in DXO to make the comparison fair.
Finally, a few words about Neutral Density filters, also known as ND filters. I had the opportunity to run a few tests with the ND64, which I normally use by the sea or along rivers, especially at sunset or sunrise. It lets me reach exposure times that, to me, create a pleasing look.
Here again, I had to do a few tests to find the right spot. I realized that if I really wanted to see the difference with and without the ND filter, especially in terms of quality and the filter’s impact on the picture, I couldn’t really shoot the sea, for example. Placing an ND64 filter on a seascape would blur the water and create that milky effect many people are looking for. So I finally tested it on fixed subjects.


After a few pictures, I can say that I’m quite happy with this filter and with the results I got. I didn’t do extensive testing, but based on the photos I was able to take with and without the filter, there is little to no change in white balance with the ND filter, and no change in image sharpness. Just compare the two images above, taken from a 100% export of an unprocessed RAW file, to which I only added sharpening for export. The result with and without the filter is identical. Admittedly, there is a slight difference between the two pictures, but it is almost certainly due to my tripod moving between the two shots (or my 5-year-old touching it, ha!).
In short, I can say that I’m really happy with this ND filter and its rendering, which suits me perfectly as well. If you shoot in RAW anyway (which I recommend), you’ll be able to adjust the final image if needed.
I still need to test the Reverse 1.2 filter. I’ll try to do it soon when the opportunity comes up, and I’ll update the end of this article!
I’m coming to the end of this first camera gear test of the KASE filters and filter holder. I have to say that I’m truly very happy with the result, the gear tested, and the new filter holder system with the wheel for adjusting the polarizing filter. So much so that, for now, I’ve set my Lee system aside—and it may well gather dust…
In any case, I can only recommend these filters and this filter holder. The whole setup, although lightweight, feels very solid. Now it remains to be seen how it holds up over time and with daily use, but I think it should age well. Feel free to take a look at their website and explore the range of filters and filter holders available. They really offer a very wide choice for mirrorless, compact, and DSLR cameras, all in different sizes to fit GND, ND, and CPL filters.
I’ll see you soon for a new camera test. If you use filters a lot, tell me which system you use. I hope I’ll have the opportunity to test other brands of filters and filter holders so I can share more feedback with you. In the meantime, don’t hesitate to read the other articles on the blog about photo accessories.
See you soon,

Written by Sylvain PONS
I've been passionate about photography since 2010, learning as I went along. Today, I dedicate myself to guiding others in their choice of camera gear and sharing a variety of tips to improve their photography skills.
Despite our care, a mistake may have slipped into this article. If you find any, please don't hesitate to let us know so we can correct it as soon as possible and keep our information up-to-date!