What is an ND filter used for in photography?
Last update: 06/24/2026
Our blog continues to grow thanks to you, our readers. This post may contain affiliate links, which means we can earn a small commission if you make a purchase through them, at no extra cost to you. This helps us to continue to bring you more and support our work!
If you are new to photography, or if you have not really looked into filters since buying your camera, you may be wondering how photographers create those silky waterfall shots or blurred seascapes. Most photographers who take this type of photo use special filters called neutral density filters, more commonly known as ND filters. After explaining the purpose of a polarizing filter in a previous article, I’m now going to explain what an ND filter is used for. We’ll look at why it is useful in photography and how it can help you improve your photos.


This is the first article in a series dedicated to ND filters.
What is an ND filter, or neutral density filter?
ND filters are filters (!) placed in front of the camera lens to create specific effects. The main advantage of a neutral density filter is that it reduces the amount of light reaching your camera sensor. Its opacity varies depending on the filter. To put it simply, an ND filter can be more or less dark depending on the one you choose, and that is what determines how you use it.
The more opaque, or darker, your ND filter is, the more light it will absorb. So why would anyone want to absorb light? The idea is not to make the photo darker, because that is not the point. The goal is to create certain effects in your image.

Landscape photography and filters work really well together. Here is the ND Big Stopper filter from Lee – More details on Amazon
In two other articles, I explain how to choose an ND filter, what criteria to consider, and how to use an ND filter for long exposures.
What is an ND filter used for?
As I’ve just explained, the main role of an ND filter is to absorb light. Now let’s look more closely at what an ND filter is actually used for in photography.
If we do not adjust our camera settings, the photo will be darker when using an ND filter. So we compensate for this loss of light by changing one or more of the exposure settings used to take the photo, namely:
- The shutter speed: we can slow it down to let more light reach the sensor (for example, from 1/100th to 1/20th). This is one of the major advantages of an ND filter, as it allows us to reduce the shutter speed and shoot long exposures in conditions where it would be difficult without a filter,
- The aperture: we can “open up” the aperture, meaning we let in more light by going, for example, from f/11 to f/5.6 (but be careful, as this will also affect your photo),

- ISO sensitivity: The ISO can be increased to make the sensor more sensitive to light (for example, from ISO 100 to ISO 800), but keep an eye on noise, or grain, in your photo.
You may now be thinking: that’s all very well, but what is the point of an ND filter then? I’m getting to that. As I just explained, one of the main reasons to use an ND filter is to slow down the shutter speed used to take your photo. So, when is that useful?
For me, there are 3 situations where an ND filter is useful in photography.
1 - To create a long exposure shot
So we are now back to what I mentioned in the introduction. One of the great advantages of an ND filter is that it can help you shoot long exposures, especially in the middle of the day when the sun is at its brightest and harshest. In broad daylight, it is usually impossible to create a long exposure, even with optimized camera settings (lowest ISO and the aperture stopped down as far as possible). The shutter speed will still be too fast, so movement in the scene will not be captured.
As explained above, an ND filter allows you to absorb light and therefore increase the exposure time.

Long exposure times are often used to create beautiful effects on large bodies of water (the sea, rivers, streams, fountains), but also with clouds, stars, or even traffic trails. Your choice of ND filter will depend a lot on your shooting habits (during the day, in the evening, at night) and on the effect you want to achieve (a misty effect on the sea, a completely smoothed image, and so on).
However, to use this technique, you will need a tripod to keep your camera steady, as exposure times can range from 10 seconds to several minutes!
2 - To maintain a shallow depth of field
If you are wondering what else an ND filter can be used for beyond long exposures, this is another good reason. These filters are especially useful for maintaining a shallow depth of field, particularly (but not only!) for portrait photography.
If you want to photograph an object or a person in full sun in the middle of the day with a very shallow depth of field (for example, f/1.8), you will quickly run up against your camera’s maximum shutter speed (around 1/4000 to 1/8000), even with the ISO set as low as possible. Despite your best efforts, your photo will still be overexposed.

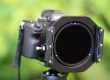
Here is an example of an ND filter, the excellent Little Stopper from Lee – More details on Amazon
This is where the ND filter really comes into its own. By absorbing light, it allows you to reduce your camera’s shutter speed without changing your depth of field. In other words, you can keep the background blur while maintaining the correct exposure for the scene!
3 - To make people disappear from your photos
What do you mean? You can make people disappear from a photo without Photoshop?! Yes, absolutely, that is another thing an ND filter can be used for!
If you are in a touristy area and you are tired of people walking in front of your camera, making it impossible to take a clean shot, use an ND filter! ☺

The general principle stays the same. Attach your ND filter (the most opaque one you have), choose the camera settings that give you the longest possible exposure time (lowest ISO and a small aperture), and take the shot.
For example, if you take a 30-second photo and only one or two people pass in front of the camera during that time, they will not appear in the final image!
Just like with the exposure time needed for a waterfall or the sea, this technique requires a tripod!
ND filters: disadvantages
And yes, even though landscape photographers often can’t live without them, using an ND filter does come with a few drawbacks! Here are a few things to know if you are planning to use one:
- Most importantly, using an ND filter (especially for long exposure) will require the use of a tripod, and therefore the purchase of one if you do not already have one. After all, it is almost impossible to stay perfectly still for one second, let alone 30 seconds!,
- The choice of filter and its quality will be essential if you want to avoid a noticeable loss of image quality. You can take a look at my article for a detailed explanation of how to choose an ND filter and which ones to consider,
- Even though these filters are called “neutral density” filters, many of them, even some of the best ND filters, tend to affect the white balance of your photo. Some post-processing will therefore be necessary,
- Depending on the opacity of your ND filter, you may no longer be able to see anything through your camera’s viewfinder. You will therefore need to compose the scene before mounting the filter!
- Again, depending on your filter’s opacity and your camera’s ability to focus in low light, your camera may no longer be able to focus in autofocus mode. Manual focus (on a tripod) will therefore be necessary

So, I hope that after reading this article, you are no longer wondering what an ND filter is for and that you are convinced it is well worth buying one! Either way, it is a tool I highly recommend if you want to improve your travel photos and make your landscape images more successful.
Feel free to read this article to find out which ND filters to choose and how to choose them.
If you have any questions about this article or would like more information on ND filters, leave a comment at the bottom of this article! Have you ever used an ND filter? If so, for what purpose? I also recently wrote a complete guide explaining what camera lens filters are used for and which ones are the most useful in photography. Take a look if you’re interested.
If you liked this article, feel free to share it on social media!
See you soon,

Written by Sylvain PONS
I've been passionate about photography since 2010, learning as I went along. Today, I dedicate myself to guiding others in their choice of camera gear and sharing a variety of tips to improve their photography skills.
Despite our care, a mistake may have slipped into this article. If you find any, please don't hesitate to let us know so we can correct it as soon as possible and keep our information up-to-date!