How to choose an ND filter for long exposure photography
Last update: 06/24/2026
Our blog continues to grow thanks to you, our readers. This post may contain affiliate links, which means we can earn a small commission if you make a purchase through them, at no extra cost to you. This helps us to continue to bring you more and support our work!
This article is the second in my series on ND filters. In the first one, I explained what an ND filter (or neutral density filter) is, what it’s used for, and why photographers rely on this essential accessory to create beautiful long exposure photos. If that first article convinced you that this type of filter is useful, you are probably now asking yourself which ND filter you should choose. Density, brand, quality, and the time of day you shoot all matter.
If you want to understand photography better and choose the right ND filter for your gear, this article is for you.
By the way, I personally use a lot of lens filters (polarizing, ND, grad/GND) instead of spending extra time in Photoshop and Lightroom. That’s my choice. I’ve already explained in my previous article that ND filters can also be used with a polarizing lens filter (or “pola,” as it is sometimes called). Even if it means carrying a little more equipment in your photography bag, using the two filters together can definitely be worth it in the final image. As a quick reminder, a polarizer makes colors look richer and increases contrast in your image.
A neutral density filter (sometimes called a “neutral filter”) is an essential filter for long exposure shots, especially in landscape photography. It is one of the accessories landscape photographers use to lengthen exposure time by slowing down the shutter speed. This technique lets you photograph the sea, water, waterfalls, or clouds in a more creative way. Very often, your images will look stronger and convey a more distinctive atmosphere. An ND filter is also very useful for reducing the intensity of bright light in the middle of the day. When I travel, I always keep one in my bag, and when I need it, I can mount it quickly by screwing it onto the filter thread (or sliding it into the filter holder system if I’m using a square filter). Other photographers use an ND filter on their DSLR when the light is too bright, for example in portrait photography, so they can shoot with a shallow depth of field by using a wide aperture.
For long exposure photography, a tripod is essential if you want to avoid motion blur caused by camera shake. The exposure can be so slow that taking the shot handheld simply becomes impossible. Remember that the main purpose of an ND filter is to darken the scene. Depending on how opaque the filter is, it will reduce the light more or less strongly. With a variable ND filter, you can rotate the filter to get a slower shutter speed and create that silky effect you love. You will also need either a remote shutter release or your camera’s self-timer. In any case, photographing waterfalls and rivers with an ND filter to create a ghosting effect can quickly become a real passion!
ND filters do have a few drawbacks. White balance can shift when you take the photo, which means some post-processing may be needed afterward. In other words, a blue or red color cast may appear. Another drawback, depending on how much light reaches the lens, is that autofocus may stop working because the camera can no longer focus on its own. You may also be unable to see anything through the viewfinder. And most of the time, you will not be able to use the lens hood.


So, which neutral density filter should you choose, and how do you choose an ND filter?
In this article, I’ll explain the main characteristics and criteria to consider when you choose your neutral density filters. I’ll focus here on long exposure photography, one of the most important techniques to master if you want to take great travel photos. In my opinion, using an ND filter is one of the best landscape photography tips I can give, along with using a circular polarizer.
1 - The different types of neutral density filter (ND): screw-on circular filters or square filters with a filter holder
Here are the practical points you need to know about each type of ND filter, along with their main advantages and disadvantages.
Screw-on circular ND filters
Screw-on circular ND filters are placed directly in front of your camera lens. Each filter has a specific diameter (for example, 55mm, 82mm, etc.), so using them is fairly straightforward.

Here is an example of a circular ND filter, the very good B+W 106 (ND64). I used it for a very long time on my wide-angle lens – More details on Amazon
Advantages:
- It is quick to install (screw on/unscrew) and easy to use,
- A screw-on ND filter doesn’t take up much space in your camera bag,
- It can be used with a UV filter,
- It does not allow stray light to pass between the filter and the camera lens,
- It is generally cheaper than a system using a filter holder.
Disadvantages:
- A screw-on circular filter has a single diameter, which “in theory” limits it to lenses with the same diameter as the filter,
- You may need to buy several ND filters, one for each lens diameter,
- It is very difficult, or even impossible, to use with a graduated neutral density filter (GND), which is very useful in landscape photography.
Of course, as I explained in my previous article, you can also buy an adapter ring so you do not need an ND filter for every lens diameter you own. The idea is to buy an ND filter that fits the largest diameter among all your lenses, current and/or future. You can then buy an adapter ring (a step-up ring in this case), which lets you attach your ND filter to lenses with smaller diameters. For example, if you have a 300mm telephoto lens with a 67mm diameter, a 77mm standard lens, and a 24mm wide-angle lens with a 67mm diameter, you only need to buy a 77mm ND filter. Keep in mind, however, that significant vignetting may appear in your photos, and you will no longer be able to use a UV filter with this otherwise very economical option!
Keep in mind that ND filters also come in slim and normal (regular) thickness versions. Depending on the focal length you use, this is another point to consider. With a wide-angle lens, it is recommended to use a slim ND filter.
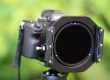
Square ND filters with a filter holder
The second type of ND filter is square (or rectangular) and used with a filter holder. Basically, you need to buy an adapter ring that attaches to the front of your camera lens, and then attach the filter holder to that ring. The holder has several slots, so you can slide different filters into it at the same time.

Landscape photography and filters work beautifully together. Here is the ND Big Stopper filter from Lee – More details on Amazon

I have been using Lee’s filter holder system (the Lee Foundation Kit) from the start to mount my ND and GND filters – More details on Amazon
Advantages:
- This system does not require you to buy several ND filters, since the filters are inserted into a holder that attaches to your lens via an adapter ring,
- You only need to buy adapter rings for the different diameters of your lenses, which is cheaper than buying ND filters for each diameter.
- This system is perfectly suited to using graduated neutral density filters (GND), which are very useful in landscape photography.

I use Lee’s adapter ring to attach the filter holder system to my lens on my Canon EOS 6D – More details on Amazon
Disadvantages:
- It is not possible to use a UV filter with this system,
- The kit (filter holder + adapter ring) is usually more expensive than a screw-on circular ND filter,
- The setup takes a little more time and practice to master,
- The whole system takes up more space in your camera bag.
So now you have the information you need to choose your ND filters based on the different types available.
2 - Should you choose a fixed or variable neutral density (ND) filter?
Yes, choosing an ND filter is about to get a little more complicated! You also have two options depending on the density you need: fixed or variable (with a gradient).
A fixed density ND filter has only one density level, of course. You need to choose it based on the type of photos you want to take and the time of day you plan to shoot, which we’ll discuss in the next section. Personally, I only use fixed ND filters, and I’m very happy with them.

Here is an example of a Hoya variable density filter – More details on Amazon
A variable neutral density filter lets you adjust the filter density depending on the scene you want to photograph. On paper, it sounds like the ideal solution. In practice, though, variable density filters are made of two equally sized, stacked polarizing filters, which makes the glass thicker and increases the risk of optical defects in your photos, such as flare and vignetting.
Opinions are divided on this, and I have not yet had the chance to test these variable filters personally. If you’re unsure, I currently recommend using fixed density ND filters, which are in fact the most commonly used. I can’t recommend the best variable ND filter yet, but I’m curious to test one!
3 - Which ND filter density should you choose?
Once you have chosen the type of ND filter you want and decided between fixed or variable density, the next important factor is the actual density of the filter. In other words, you need to choose how opaque, or how “dark,” the filter should be. So how do you choose the density of your ND filter? In my opinion, there are two factors to consider together before you buy.
What type of photo do you want to take?
That is the first thing to consider. Most people who buy ND filters use them for long exposures, especially for the sea, waterfalls, streams, and similar scenes.
You need to ask yourself whether you want to take “standard” long exposures, meaning simply capturing the movement of flowing water, or whether you want to create a misty or fog-like effect, or smooth the sea completely. So what do I mean by that?
It’s the difference between the two photos below:


When will you use your ND filter the most?
Once you know what type of photo you want to take, you need to think about when you will use the filter the most. During the day in bright sunlight? Early in the morning or late in the evening? At night?
To keep things simple, if you plan to use an ND filter mostly for photos in bright light, you will need a high-density filter. Light is a much bigger issue at midday than it is at 8 a.m. or 5 p.m. To counter this strong light and achieve a long exposure, you will need an almost completely opaque (black) ND filter to extend your exposure time. In the early morning and evening, the light is weaker, so you can use a less opaque ND filter to achieve the same kind of long exposure you would get at midday.
The different ND filter densities
When you’re just starting out, understanding how the different densities work is not easy, and manufacturers certainly do not make it any simpler. Still, it is an essential factor when choosing your ND filters.
Depending on the brand, density may be shown as:
- The optical density of the filter: for example, 0.3 or 1.2
- The filter coefficient (the number after “ND”): for example, ND 4 or ND 64
Below, you’ll find two tables that summarize the factors you need to compare together.
The table below shows the relationship between the optical density of the filter (D), the coefficient (ND), and the shutter speed adjustment in stops (IL/EV).
| ND filter coefficient | Density (D) | Stop (IL/EV) |
|---|---|---|
| 2 | 0,3 | 1 |
| 4 | 0,6 | 2 |
| 8 | 0,9 | 3 |
| 16 | 1,2 | 4 |
| 32 | 1,5 | 5 |
| 64 | 1,8 | 6 |
| 128 | 2,1 | 7 |
| 256 | 2,4 | 8 |
| 512 | 2,7 | 9 |
| 1024 | 3 | 10 |
For example, with an ND 64 filter, you lose 6 stops (IL/EV). To compensate for the loss of light caused by the filter, you therefore need to slow your shutter speed by 6 stops. Is that enough for how you plan to use it?
The second table shows four filters with different densities (ND 8, ND 16, ND 64, and ND 1000), the loss of stops (IL/EV), and the corresponding shutter speeds. This table should be very useful when choosing your ND filters!
Example: 1/250 without a filter = 1/15 with an ND 16 filter (loss of 6 stops)
| Shutter speed without any filter | ND8 | ND16 | ND64 | ND1000 |
|---|---|---|---|---|
| 1/32000 | 1/4000 | 1/2000 | 1/500 | 1/30 |
| 1/16000 | 1/2000 | 1/1000 | 1/250 | 1/15 |
| 1/8000 | 1/1000 | 1/500 | 1/125 | 1/8 |
| 1/4000 | 1/500 | 1/250 | 1/60 | 1/4 |
| 1/2000 | 1/250 | 1/125 | 1/30 | 1/2 |
| 1/1000 | 1/125 | 1/60 | 1/15 | 1s |
| 1/500 | 1/60 | 1/30 | 1/8 | 2s |
| 1/250 | 1/30 | 1/15 | 1/4 | 4s |
| 1/125 | 1/15 | 1/8 | 1/2 | 8s |
| 1/30 | 1/4 | 1/2 | 2s | 30s |
| 1/15 | 1/2 | 1s | 4s | 60s |
| 1/8 | 1s | 2s | 8s | 2' |
| 1/4 | 2s | 4s | 16s | 4' |
| 1/2 | 4s | 8s | 32s | 8' |
Here is an example: in the middle of the day, your camera might give you a shutter speed of 1/500 without a filter (and at the lowest ISO). If you use an ND 16 filter, you will only reach 1/30, which will not be enough for a truly long exposure. On the other hand, with the same starting shutter speed (1/500) and an ND 1000 filter, you’ll get a 2-second exposure.
If you understand how this works now, you should be able to choose the right ND filter, right?
4 - Which ND filter should you actually buy? My recommendations
There isn’t really one “best” ND filter. My advice is to choose your ND filter based on the time of day you shoot and the look you want to create. When I was starting out, I bought an ND 64, then later I purchased an ND 1000.
- I use very few ND filters below ND 8 (or even ND 16). In my opinion, the loss of light and the necessary shutter speed adjustment are too limited for these filters to be useful in most situations. In the middle of the day, for example, you will not be able to get the long exposures you want (e.g., with an ND 16, 1/250 without a filter = 1/15 with the filter).
- However, the ND 16 works well for long exposures in low-light conditions, such as undergrowth, shade, early morning, or late evening. Example: ND 16, 1/30 without a filter = 1/2 second with the filter.
- I personally prefer the ND 64 (loss of 6 stops), which I think is perfect for long exposures during golden hour (early morning and late evening). Without a filter, you will usually get shutter speeds from 1/60 to 1/15, while with an ND filter, you will get slower shutter speeds from 1s to 8s. That is perfect for a “standard long exposure,” and it also prevents the effect from becoming completely blurred. This is probably the first ND filter I would recommend buying. However, for photos taken in direct sunlight, its opacity may not be sufficient, depending on the light intensity of the scene.
- The ND 1000 is perfectly suited to long exposures in the middle of the day or in sunny conditions (1/250 without a filter = 4s with an ND 1000). However, it does have its limits in low-light conditions, because exposure times can quickly become too long (e.g., 1/15 without a filter = 1 minute with an ND 1000). For seascapes, for example, it can give you completely smooth, flat, white water! By the way, if you’re shooting near the sea, I do recommend using a cleaning cloth for your filters.
Which ND filters should you choose for your situation?
Before buying, remember to check your filter diameter carefully and choose between slim and normal versions
What is the best ND filter? Which one should you choose? Here are my recommendations!
For light long exposures in low-light conditions (ND 16)
- Screw-on ND filters:
- Filters for a filter holder system:
For photos taken during golden hour (morning/evening): ND 64
- Screw-on ND filters:
- Filters for a filter holder system:
Which ND filters are best for daytime long exposures and/or very long exposures (ND 1000)
- Screw-on ND filters:
- Filters for a filter holder system:
For anyone interested in very long exposure photography in the middle of the day, a few high-density filters are known for being very good quality. Here are three in particular:
- Lee Super Stopper ND filter (15 stops – Density 4.5)
- Nisi ND filter: 15 stops
- Nisi ND filter: 20 stops
If you want to use a graduated ND filter, you will need a filter holder. I’ll cover these filters, which partially reduce the brightness of a scene (mainly the sky, which is often overexposed compared to the darker foreground), in more detail in other articles.
If you want to go further, I suggest checking out our full article on Kolari ND filters, which are great ND filters that we had the opportunity to test thoroughly!
5 - Which ND filter brand should you choose?
Not all ND filters offer the same level of quality. There are probably good value-for-money ND filters on the market, but I have not personally tested them. However, I would advise you to avoid the cheapest ND filters, which are known for their poor quality. Here are some of the best-known brands for overall quality and the ND filters they offer:
- B+W ND filters
- Lee ND filters
- Nisi ND filters
- Hitech ND filters
- Tiffen HD filters
- Heliopan ND filters
- Hoya ND filters
- Rodenstock ND filters
- Marumi ND filters
Of course, other brands exist too, such as Cokin or Singh-Ray.
6 - What is the best ND filter?
It’s sometimes difficult to decide which ND filter to choose and which ones can really be considered the best. I’ve had the opportunity to test quite a few of them. Recently, I also had the chance to test the new Kolari ND filters, which are really good across the board (no vignetting, no loss of sharpness, no impact on white balance, no flare, etc.). Kolari originally manufactured infrared filters. In short, here is a summary of what I think are among the best ND filters at the moment:
- Breakthrough Photography ND filters: from 49mm to 95mm and from 3 stops to 15 stops,
- PolarPro 77mm Variable ND Filter: 2 to 5 stops
- B+W XS-Pro Digital ND MRC Nano
- Freewell Variable ND filter: from 58 to 95mm and from 2 to 5 or 6 to 9 stops
- Kolari Pro Gorilla Glass ND filter: from 52 to 82mm and from 4 to 20 stops
That’s it! I hope you enjoyed this article and now have all the information you need to choose the right ND filter for your camera and the long exposures you want to create. Now it’s time to figure out exactly how to take those beautiful photos with your ND filter, right?
In the meantime, I’d also like to let you know that we’ve written a detailed article about photo printers for traveling. You might find it interesting!

Written by Sylvain PONS
I've been passionate about photography since 2010, learning as I went along. Today, I dedicate myself to guiding others in their choice of camera gear and sharing a variety of tips to improve their photography skills.
Despite our care, a mistake may have slipped into this article. If you find any, please don't hesitate to let us know so we can correct it as soon as possible and keep our information up-to-date!


Thank you for this useful article, comprehensive explanations for a beginner.
My problem is a little different as I wish to use a ND filter on a smartphone. I bought a Moment mobile case for my Pixel 4a phone and a 37 mm adapter to mount filters.
What do you think about variable ND filters. They do not produce the same quality than a fixed ND filter but are cheaper because variable. And for a smartphone the image quality isn’t that great anyway.
For my case and usage (smartphone+need to use various ND filters in various conditions) would you recommend a variable ND filter or should I stick with non variable ND filters and begin with buying a 37 mm ND64 filter?
Thank you.
Hi,
I will recommend to only use ND filters and not variable ones. But again, I’ve not use much such filters on smartphone 🙂
Would you suggest using ND filters with a zoom lens. I have a nikon 24-70mm zoom lens. My compliments for your detailed article. Edgar
Hi Edgar,
Yes, a prime lens or a zoom lens is the same regarding using an ND filter 🙂
S.
Hi Sylvain,
I purchased a new camera and am going to do some creative slow shutter speed. If you had to buy ND filters for your lenses that have different filter sizes, it could get expensive. I have a Canon R5 and some legacy lenses. I purchased a ND16 for the lens adaptor. https://www.ebay.com/itm/133426464063 I am now going to purchase the others you suggested. Two questions. Have you used this type of filter? The advantage is obvious, you only need one for every lens you have because it sits behind the lens for bulbus lenses like nikon 14-24 2.8 (there are also sensor filters being produced for DSLR and mirrorless without adaptors). How do you rate these for image quality comparted to your other suggested ND filters? Also, they do not sell a ND1000.. Only the ND256 and the ND4000… if you only could pick one (knowing you also have the ND16 and the ND64) which one would you choose? Richard
Hi Richard,
I’ve never used rear filter personally, as I prefer to use screw-in filter and filter holder for GND’s. For your choice, it all depend on when you’re going ti use them most of the time. A ND4000 is useful only in full sun mostly, otherwise at dawn/sunset/sunrise, you’ll get exposure time way to long. I will prefer to use a ND64 for sunset/sunrise as I suggested !
Sylvain
Very good explanation about ND filters.
It helped me a lot to make my choice.
Well done.
Thank you.
Kurt
Hi Kurt,
Thanks for your message. I’m glad you liked the post 🙂
Sylvain