How to choose a polarizing filter
Last update: 06/24/2026
Our blog continues to grow thanks to you, our readers. This post may contain affiliate links, which means we can earn a small commission if you make a purchase through them, at no extra cost to you. This helps us to continue to bring you more and support our work!
After recently explaining what a polarizing filter is used for, especially in landscape photography, I felt it was important to take things a step further and explain how to choose a polarizing filter. There are so many options available that it can be hard to know which one to pick. These filters are most often used to increase contrast and bring more depth to your photos. When you’re starting out in photography, learning how to use a polarizing filter is a great way to improve your images. Also keep in mind that standard camera lenses, whatever the brand, can usually take a polarizing filter.
This is the second article in the polarizing filter series on my photography blog, and I hope it helps you understand the topic more clearly and simply. Depending on how and where you shoot, certain situations will call for a polarizing filter to compensate for, correct, or simply remove reflections in a photo. The purpose of this article is not to test the best 82mm polarizing filter (assuming one even exists), but to help you choose the right one for your needs, budget, and photography style.


One important thing to keep in mind is that a polarizing filter improves your photos at the moment you take them, which can also reduce the number of hours you spend in post-processing (or post-production, meaning editing software on a computer). Just place the filter in front of the lens and look, without using the viewfinder, to see the effect: richer colors and that polarized light I like so much. With that in mind, it makes sense to choose the best-quality polarizing filter you can afford. See it as a long-term investment, and try not to skimp just to save a few dollars. It is definitely better to choose a good polarizing filter from the start. So which one should you choose, and how?
You should also know that you can use a polarizing filter on a DSLR camera or a mirrorless camera!
A quick reminder about the polarizing filter
If you are not familiar with polarizing filters or what they are used for, I invite you to read my dedicated article on the subject. Basically, a polarizing filter is a photography filter widely used in landscape photography. It is one of the most useful, and perhaps even one of the most essential, accessories to keep in your camera bag (along with a tripod, memory cards, and a neutral density filter, or ND filter). In bright sunlight, it can genuinely save an entire shoot! A polarizing filter is also very often used with a wide-angle lens, which can help you capture even better images.
Here are a few key things to remember
How to choose a polarizing filter
In my opinion, there are five main criteria to consider when buying a polarizing filter:
1 - The diameter
This is definitely the first thing to check when choosing a polarizing filter. The filter has to match your camera lens diameter, so check your lens first. The diameter is indicated on the front of the lens in millimeters (for example: 16mm, 35mm, 50mm, 55mm, 65mm, 77mm, 82mm, 100mm, 300mm, etc.).

Example of a high-quality Marumi polarizing filter – More details on Amazon
In theory, one polarizing filter in the right size should be enough. I say “in theory” because there is a way to avoid buying one polarizing filter for each lens, which can quickly get expensive if you own four or five.
Basically, if you have several lenses, you can buy an adapter ring to make your filter work with all of them. Choose a polarizing filter that fits your largest lens diameter, then buy an adapter ring that reduces the diameter and lets you use that same polarizing filter on smaller lenses.
2 - The type
Here is another criterion to consider, even if it is becoming less relevant today. Overall, there are two types of filters:
Circular polarizing filters (CPL): most polarizing filters sold today fall into this category. These filters let you adjust the polarizing effect in your photo. Once the filter is attached, you can rotate it to increase or reduce the effect depending on the scene and the lighting conditions. I often try several positions before choosing the level of polarization I want for a landscape. These are the easiest filters to use and the ones I especially recommend.
They are also very simple to handle: place the polarizing filter on the thread of your camera lens, screw it on, and rotate it until you get the effect you want. Just keep in mind that using a lens hood will be limited in most cases. When you’re done, simply unscrew the filter, clean it with a cloth, and store it in its case to keep dust away.

I have been using Hoya HD polarizing filters for a long time – More details on Amazon
Square/rectangular polarizing filter : this is an alternative to the CPL filter. Some well-known brands offer this type of filter, including Cokin and Lee. However, these filters have one major drawback: they are linear polarizing filters. This means you cannot easily adjust the desired level of polarization for your scene. Also note that they have to be mounted on a filter holder.

Example of a NISI square polarizing filter – More details on Amazon
You should also know that you can use a polarizing filter with other filters (GND, ND) thanks to a filter holder system. I have just finished my first complete test of the K9 filter holder from KASE and their filters.
3 - The brand
Wondering which brand to choose? Is there such a thing as a good brand? In my opinion, this is an important criterion when choosing a polarizing filter. Some brands clearly stand out, and many photographers consider them among the best on the market:
Other brands also exist, such as Hama or Marumi.
Note that if you have a Canon lens, a Nikon lens, a Zeiss lens, or a similar brand, polarizing filters can be mounted on them. You should also know that major camera brands have made their own filters too. Canon polarizing filters and Nikon polarizing filters do exist, although relatively few people actually choose to use them.

Here is the Lee polarizing filter I use on my wide-angle lens – More details on Amazon
I generally recommend sticking with well-known brands; you are less likely to get unpleasant surprises with filter quality or its impact on your photos.
4 - Filter thickness
This is another key criterion when choosing your polarizing filter. There are two main options: normal and slim / ultra-slim (“thin”). Thin models are almost essential for wide-angle lenses. Depending on the focal length you use, the type of camera (APS-C or full frame), and the aperture you shoot at, you may see more or less vignetting around the edges of your photos. As for aperture, the wider you shoot (for example, f/2.8), the more likely vignetting is to appear. In practice, this means the edges of the photo are less evenly filtered, which is not ideal!
A normal filter is simply thicker than a slim one. To avoid this problem, you need to think about the focal length you use most often and the type of camera you shoot with. With wide-angle and ultra-wide-angle lenses, vignetting can appear quite quickly, starting around 21 mm on full frame, and 16/17 mm on APS-C.


It would be impossible for me to list every lens and polarizing filter combination here and say whether vignetting will appear or not. The best thing to do is check forums before buying. With long focal lengths and zoom lenses, you should obviously have no problems with vignetting.
I use a very good polarizing filter on my Canon 70-300 L IS zoom, and it works perfectly.
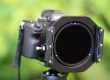
For my landscape photography lens, the 24-70 mm L f/2.8, I use Lee’s system, with the Foundation Kit and an 82 mm wide-angle adapter ring to mount my Lee Landscape Polarizing Filter (105 mm). It all cost an arm and a leg, but I’m delighted with it!
For reference, I can stack two lens filters on my filter holder (Big Stopper filters + GND Soft Edge 0.9 Gradient Filter) and add my polarizer on top, without seeing any vignetting at 24 mm.
5 - Budget
Budget is still the most sensitive point for some people. I know I’m repeating myself, but do not skimp on the quality of your polarizing filter if you want to avoid degrading your photos.
There are polarizing filters for every budget, from good value options to very expensive models, ranging from €20 to more than €200 per filter. The price will mainly depend on:
- Diameter : the larger the diameter of your lens, the more expensive the filter will be,
- Brand : well-known brands (and generally higher-quality ones) are also more expensive,
- Quality : better glass and better coatings come at a price, and a good filter will obviously cost more than a poor-quality or low-end one.
To choose a polarizing filter, gather as much information as possible about the different types available and compare your options before making a decision. In the next section, I’ll share a few polarizing filter recommendations for different uses.
Which filters should you choose? My recommendations
Here are a few of my recommendations to help you choose a polarizing filter based on different types of lenses. I prefer slim filters whenever possible, especially for wide-angle lenses.
Wide-angle lenses
Here are my filter recommendations by lens, grouped by diameter (it’s easier):
67mm : Hoya filter, Marumi filter
- Canon EF-S 10-18 mm f/4,5-5,6 IS STM – 67 mm
77mm : Hoya filter, B+W filter and Marumi filter
- CANON EF 17-40 mm f/4L USM – 77 mm
- CANON EF-S 10-22 mm f/3.5–4.5 USM – 77 mm
- Nikon AF-S DX 10-24 mm f/3.5-4.5 – 77 mm
- Nikon Nikkor AF-S 16-35 mm f/4G ED VR – 77 mm
- Tamron AF 10-24 mm f/3,5-4,5 DI II LD IF – 77 mm
- Tokina AT-X PRO DX II 11-16 mm f/2.8 – 77 mm
82mm : Hoya filter, B+W filter, Marumi filter
- CANON EF 16–35 mm f/2.8 L USM II – 82 mm
- Sigma 10-20 mm f/3,5 EX DC HSM – 82 mm
- Tokina 11-20 mm f/2,8 AT-X PRO DX – 82 mm
Standard lenses
Here are my recommendations for standard lenses:
77mm : Hoya filter, B+W filter, Marumi filter
- Canon EF-S 18-55 mm f/3,5 – 5,6 IS STM – 77 mm
- Canon 24-70 mm f/4.0 L IS USM : 77 mm -> I personally use the Foundation Kit and a 82mm wide-angle adapter ring to shoot with my Lee Landscape Polarizing filter (105 mm).
- Nikon AF-S 24-70 mm f/2.8G ED – 77 mm
82mm : Hoya filter, B+W filter, Marumi filter
- Canon EF 24-70 mm f/2,8 L II USM – 82 mm
- Sigma 24-70mm f/2.8 DG OS HSM – 82 mm
- Tamron SP 24-70 mm f/2,8 Di VC USD – 82 mm
Telephoto lenses
And for telephoto lenses:
67mm : Hoya filter, Marumi filter
- Canon 70-200 mm f/4.0 L USM – 67 mm
- Canon EF 70-300 f/4-5.6 L IS USM – 67 mm
- Nikon 70-200 mm f/4,0 G ED VR AF-S – 67 mm
77mm : Hoya filter, B+W filter, Marumi filter
- Canon EF 70-200 mm f/2,8 L IS II USM – 77 mm
- Canon EF 70-200 mm F/2,8 L USM – 77 mm
- Nikon AF-S NIKKOR 70-200 mm f/2.8G ED VR II – 77 mm
- Sigma 70-200 mm f/2,8 DG APO OS EX HSM – 77 mm
- Tamron SP AF 70-200mm f/2,8 Di VC USD – 77 mm
So there you have it. I hope this article has helped you choose a polarizing filter and that you now feel ready to make an informed purchase. If you still aren’t sure what a polarizing filter actually does, take a look at this article to find out what a polarizing filter is used for.
Once you have made your purchase, feel free to read the article explaining how to use a polarizing filter in photography.
If you are hesitating between several filters or have any questions about this article, feel free to leave me a comment at the bottom of the page. I’ll be happy to answer!
Today, I consider a polarizing filter an essential accessory for landscape photographers; mine never leaves my camera bag! You don’t need to be a professional photographer to use a polarizing filter. Passionate amateur photographers, like you and me, can use one easily with a little practice.
What about you? Do you already use this type of filter? Once you get used to it, shooting with a polarizing filter quickly becomes second nature!

Written by Sylvain PONS
I've been passionate about photography since 2010, learning as I went along. Today, I dedicate myself to guiding others in their choice of camera gear and sharing a variety of tips to improve their photography skills.
Despite our care, a mistake may have slipped into this article. If you find any, please don't hesitate to let us know so we can correct it as soon as possible and keep our information up-to-date!


We are heading to Polynesia in February 2023. I ran across your web site doing research on the islands. Then a month later when I was researching polorizer filters for my new camera lens I ran across your site again. Nice site thanks for all the great info.
You’re very welcome and glad you liked our blog then 🙂