Camera lens filters: uses, choices, and how to use them
Last update: 06/23/2026
Our blog continues to grow thanks to you, our readers. This post may contain affiliate links, which means we can earn a small commission if you make a purchase through them, at no extra cost to you. This helps us to continue to bring you more and support our work!
In a world where digital photography and post-processing are playing an increasingly important role, you might wonder: why would I still need a camera lens filter? It’s easy enough to take pictures without one these days, right? Well, a computer still can’t do everything, and many professional photographers agree that some lens filters remain essential. This is especially true in landscape photography, where we often want to soften, correct, or enhance certain elements directly when shooting. Digital photography is not only about taking a picture and fixing everything later in Photoshop. Want to learn more about camera accessories? In any case, filters are nothing new: they were already widely used in analog photography.
This in-depth article does not claim to cover every single type of photo filter out there. For that, you can read the more detailed articles I mention throughout this post. Here, I’ll focus on the camera lens filters I still find genuinely useful today. In my opinion, lens filters are essential for learning photography, and above all, they help you spend less time behind a computer. So, let’s go for a quick lesson on my photography blog!

General information about camera lens filters
Before going through the different filters that are still useful in photography, here is some general information about these accessories. Most of these points apply, more or less, no matter which type of filter you use.


What are camera lens filters used for?
Let’s get to the heart of the matter: what are filters actually used for in photography? Filters allow you to create or control an effect directly when taking your picture. A polarizing filter saturates colors and reduces reflections. An ND filter lengthens exposure time by reducing the amount of daylight entering your lens. A graduated neutral density filter (GND) helps balance natural light over part of the scene, so you can create a better-exposed image while shooting. UV filters, meanwhile, are mainly used to protect the lens. Each filter has its own purpose, although you can combine several camera lens filters at the same time.
In my opinion, the three most useful filters today are the ND filter, the polarizing filter, and the graduated neutral density filter (GND). Here are three important references that I have personally been using for several years.

Lee GND Soft Edge 0.9 filter – The graduated neutral density filter I use all the time for my landscape photography – More details on Amazon

Hoya HD Polarizing filter – A brand I have been using for years and that I fully recommend – More details on Amazon

Lee Big Stopper – A 10-stop ND filter well known for its excellent quality. I never leave it behind anymore – More details on Amazon
Types of filters in photography
There are generally two types of filters: circular filters, which screw directly onto the lens, and square or rectangular filters, which are inserted into a filter holder. In both cases, the filter sits in front of your lens, either by screwing on or by being held in place.
Should you choose a screw-in filter or a filter holder system?
This question comes up very often on forums, especially among photographers who are starting to progress and want to go further. Here is what I think you should remember about both systems.
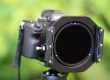
The screw-in filter is generally considered much easier to use, since you simply screw it onto the front of your lens and remove it when you no longer need it. You can even leave it mounted on the lens and store everything that way in your bag. It is light, compact, and does not take up much space in a camera bag. In general, screw-in filters also cost less than a filter holder system, especially if you use adapter rings. This means you can buy a single larger-diameter screw-in filter and use it on lenses with smaller diameters. It is an efficient and economical solution. However, this type of filter has two major drawbacks. First, stacking other filters on top can quickly become difficult. Second, you may get strong vignetting, especially at short focal lengths. In other words, black corners can appear in your photos. You also cannot really use this system with GND filters. That is where the filter holder system comes into its own.
The filter holder system is usually more expensive. You will need an adapter ring for each lens diameter you use. It is also a little more complex and takes slightly longer to set up, but once you get used to it, it quickly becomes second nature. The main advantage of a filter holder is that it can be used with graduated neutral density filters (GND). I’ll come back to this briefly below, but the idea is to place the dark part of the filter over the brightest part of your image, in order to balance the exposure of the scene when you take the picture. Of course, you can also use two or three filters at the same time on a filter holder. I have already used a GND filter to darken the sky, an ND filter (Lee Big Stopper – 10 stops) for a long exposure, and even added a polarizing filter in front of it to saturate the colors. If you want to see what this system looks like, I’ve just finished my review article on the Kase K9 filter holder system and the associated filters they sent me (polarizer, ND, GND).
In any case, remember that each type of filter system has its own advantages and disadvantages, depending on the filter you use (see below).
Pay attention to the diameter
Whatever your lens, whether wide angle, telephoto, macro, or something else, you can usually place a camera lens filter in front of it. There are a few exceptions for specific lenses, which I will not go into in this post.
The main thing to check is the diameter of your filter, which must match the diameter of your lens. That said, remember that you can use adapter rings to mount larger filters (for example 82mm or 77mm) on lenses with smaller diameters (for example 50mm or 55mm). This helps you reduce both the cost and the number of filters you need to buy. So, I really recommend thinking about this before making your purchase.

Step-up ring (K&F): a must-have accessory if you want to avoid buying several camera lens filters.
(Check prices on Amazon)
Brands and budget
So, which brand should you choose? When it comes to camera lens filters, several brands stand out and are well known in the photography world for producing quality filters (Hoya, Nisi, Cokin, Lee, Hama, and others). Of course, there are also cheaper brands, but the quality is not always there. I’ll mention the brands below, with each section dedicated to a different type of filter.
Keep in mind that with a camera lens filter, you usually get what you pay for. There are probably good filters made by lesser-known brands, but from what I have read and tested, I have always preferred to be cautious rather than end up with a poor-quality filter. Personally, I have always bought equipment from Hoya, B+W and Lee. There are also many good-quality multi-coated filters, often referred to as MRC (“multi-resistant coating”). On the other hand, a poor-quality, low-end filter can degrade your photo and make you lose sharpness.
Filter thickness
A quick note about filter thickness: there are generally two types, often called “normal” filters and “slim” filters. Slim filters are thinner and are especially useful on wide-angle lenses to avoid vignetting. To keep it simple, if a filter is too thick on a wide-angle lens, you may see it appear at the edges of your photo, which is obviously not ideal. That is why I recommend using slim filters in that case. On longer focal lengths (for example 100mm), a standard filter will usually be fine.
The polarizing filter
Also known as a circular polarizing filter, or as a “pola” or CPL in photography jargon, this is the filter I consider the most useful, especially for landscape photography. I personally use this polarizing filter on my telephoto lens, and this one on my standard zoom and wide-angle lens. I use them with a filter holder and a wide-angle adapter ring. So, what is this filter used for? In short, it can:
- Enhance and saturate the colors in your scene by increasing contrast (this is called polarization),
- Remove glare and reflections, especially on water, glass surfaces, foliage (for macro photography), or even eyes in portrait photography,
- Reduce atmospheric haze or fog, which is clearly visible in planes or mountains when you rotate the ring,
- Help with long exposures by slightly reducing the amount of light.

Be aware, however, that this filter also has a few drawbacks:
- Loss of light / slight darkening, which requires a slower shutter speed,
- It is almost impossible to use with a lens hood mounted on your DSLR,
- The polarizer is almost useless in backlit situations,
- At short focal lengths (wide angle / ultra-wide angle), some issues may appear, such as vignetting or uneven brightness across the photo. So be careful with your framing and the position of the light source in your scene.
When choosing this type of filter, remember that there are two types of polarizing filters (linear and circular), and that circular polarizing filters (CPL) are the most common. In terms of size, you can find them for almost every diameter. The larger the CPL diameter, the more expensive the filter will be. Also be careful to choose between slim and standard filters depending on your focal length.
The best-known brands for CPL filters are Hoya, Cokin, B+W, and Heliopan. Note that a polarizing filter can be combined with an ND or graduated neutral density (GND) filter. It is generally quite easy to use, and it can really help you take better pictures.
Here are my top four recommendations. Be careful to choose the right diameter for your lens!
ND filter
Also known as a neutral density filter (ND), this is the second most important camera lens filter in my opinion. Today, it never leaves my camera bag. By the way, that link explains everything you need to know before buying a camera bag! ND filters are more or less opaque (black) filters that reduce the amount of light reaching your camera sensor. They are mainly used to:
- Take long exposures when the light is strong, for example by the sea, near waterfalls, with stars, carousels, and so on. Without a filter, this is impossible in broad daylight,
- Keep a shallow depth of field by avoiding overexposure caused by too much light,
- Make moving objects or people disappear thanks to very long exposures.

On the other hand, this filter has some disadvantages to be aware of:
- A tripod is usually necessary, because the shutter speed becomes too slow for handheld photography, along with the related accessories,
- Depending on the opacity of the filter, you may no longer see anything through the viewfinder, so you will need to compose your image first. Some filters let enough light through, but you still need to watch out for motion blur, as the shutter speed can become quite slow,
- The process is trickier because focusing is often impossible with the camera’s autofocus system, depending on how dark the filter is,
- White balance may be affected by this type of filter, with colors sometimes shifting toward blue, purple, or sepia. You will therefore need to get used to processing your images in software such as Photoshop, Lightroom, or similar tools.
Below are some useful ND filter recommendations. They come either as circular filters (for example Hoya or B+W) or as square filters (Lee, Nisi), designed to be used with a filter holder. I personally own both types.
| Element | Type | Brand | Usage | Product | Buy on |
|---|---|---|---|---|---|
| Neutral Density Filter (ND) | Screw filter | B+W | Sunset/Sunrise | B+W 1.8 ND | Amazon |
| Screw filter | Screw filter | Hoya | Sunset/Sunrise | Hoya Pro ND 64 | Amazon |
| Neutral Density Filter (ND) | Square filter | Lee | Sunset/Sunrise | Lee filter Little Stopper | Amazon |
| Filter holder | - | Lee | For ND square filter | Lee foundation Kit | Amazon |
| Neutral Density Filter (ND) | Screw filter | Hoya | Daylight / Very long exposure | ND1000 | Amazon |
| Neutral Density Filter (ND) | Square filter | Lee | Daylight / Very long exposure | ND1000 | Amazon |
Choosing an ND filter mainly depends on the type of picture you want to take and the time of day you plan to use it. These factors will influence the filter density, the type of filter (screw-in or filter holder system), and the brand you choose. Lee, B+W, Nisi, and Hoya are some of the well-known names in this field.
Using an ND filter is more complex than using a polarizing filter, and you will need some practice before mastering it fully. You should also know that variable ND filters exist. Today, for all my long exposures, I use Lee’s ND Big Stopper filter (or Little Stopper), which I place on my filter holder, through an adapter ring.
Graduated neutral density filters
This is one of the last filters I usually mention, especially for nature and landscape photography. Some people would say that you can partially reproduce its effect with photo editing software. That’s partly true, but I would rather spend more time behind my lens than behind my computer, wouldn’t you? I have written a complete article on GND filters. These filters, known in photography as GND, from the English “Graduated Neutral Density”, are similar in principle to the ND filters mentioned above. However, they are more or less opaque only on part of the filter. Why? Let me explain briefly.
This type of filter is almost always rectangular. Its main benefit comes from the fact that, very often in landscape photography, there is a significant difference in brightness between the sky and the foreground. The idea is to place the dark part of the filter over the brightest area, usually the sky, to darken it. This means that when you shoot, the camera can produce a more evenly exposed image. The result is more balanced, and you avoid ending up with a completely white sky.

Even though camera sensors have improved a lot in recent years, they still often struggle to handle this kind of difference in brightness. In practice, you will not always be able to reproduce what the human eye sees. Very often, you end up with a blown-out blue sky (white) or a very dark foreground. This is the main purpose of this filter.
The choice is mainly based on filter opacity. There are often 1 to 4 stops available, allowing you to choose the right type of filter for your situation. You will then need to choose the type of transition between the opaque and transparent areas. As a general rule, there are hard, medium, soft, and reverse transitions. Everything is explained in detail in the dedicated article. Just remember that reverse GND filters are specifically designed for sunsets.
The article mentioned above (special GND filter) goes into much more detail about the different options, but here are some quality references for GND filters, filter holders, and adapter rings.
| Element | Brand | Product | Usage | Buy on |
|---|---|---|---|---|
| Filter holder | Lee | Foundation Kit | Required to set up your GND | Amazon |
| GND Filter | Lee | Kit 3 filtre GND 0,3 / 0,6, 0,9 | Depends on the light | Amazon |
| Adapter ring | Lee | Wide angle ring 77mm | To be screwed on the lens - The GND is installed on top of it | Amazon |
| GND Filter | Lee | Lee Reverse GND 1.2 | For sunset | Amazon |
| GND Filter | Nisi | Nisi GND8 0,9 (3 stops) Soft Edge | Ideal for landscape photography | Amazon |
| GND Filter | Lee | Lee GND16 (4 stops) | Perfect for seascapes | Amazon |
Using these filters requires a filter holder system, which can be used both on a tripod and handheld. For long exposures, this filter can be combined with a polarizing filter and/or an ND filter. Of course, you can also use it on its own.
Like many professionals, I recommend using quality GND filters from recognized brands, such as Lee and Nisi filters. From here on, we move into filters that are more like accessories, so I won’t spend too long on them.
UV and neutral filters
The UV filter is mainly used to block UV rays before they reach your lens. It can also be used as a neutral protective filter in case of a fall or impact. Today, not many people buy these filters anymore, especially since most lenses are already treated against UV rays. And that’s about it!
Special filters
A few brief words about another type of filter. Some photographers still use filters for black and white photography. Examples include infrared, red, orange, yellow, or green filters. These filters allow you to create very different effects compared with a standard filter. For example, a red filter is known to absorb blue and green colors, while strengthening the red tones.
That brings us to the end of this broad article on camera lens filters. I hope you learned something, and I invite you to click through the links in the article if you want more detailed information about the different filters I have described. I remain convinced that filters are worth using, rather than relying only on layers, sliders, photo effects, and adjustments in advanced image-processing software. If you want to read more, I also invite you to check out our detailed article on the new NISI V7 100mm filter holder system.
From your perspective, what is the most essential camera lens filter? Have you ever used one of these filters? Personally, polarizing, ND, and GND filters never leave my camera bag. If you are new to photography or still don’t know which DSLR to use, I recommend reading my article on how to choose your DSLR. Who knows, it might help.

Written by Sylvain PONS
I've been passionate about photography since 2010, learning as I went along. Today, I dedicate myself to guiding others in their choice of camera gear and sharing a variety of tips to improve their photography skills.
Despite our care, a mistake may have slipped into this article. If you find any, please don't hesitate to let us know so we can correct it as soon as possible and keep our information up-to-date!