Graduated neutral density filters (GND): how to choose and use them
Last update: 06/23/2026
Our blog continues to grow thanks to you, our readers. This post may contain affiliate links, which means we can earn a small commission if you make a purchase through them, at no extra cost to you. This helps us to continue to bring you more and support our work!
Over the past few years, buying a DSLR has become much more affordable, and many people now own one. It has even become a common Christmas or birthday gift. Prices have dropped, and for less than €400, you can find an entry-level DSLR that is perfectly suitable for starting out and learning photography. As a follow-up to my article on the camera lens filter and its usefulness, I wanted to finish this series on filters with the graduated neutral density filter (GND), also known as a graduated ND filter or ND grad.
After explaining the benefits, how to choose, and how to use a polarizing filter and a neutral density filter (ND filter), here is a more detailed article on these famous GND filters. I’ll explain what they are used for, their advantages and drawbacks, how to choose them, how to use them, and finally how to clean and store them. I’ll also give you my recommendations at the end of the article. So, let’s get started!
For many landscape photographers, this is THE essential filter for great landscape photography. Personally, mine never leave my camera bag, and I carry them everywhere with my wide-angle lens.
1 - What is a graduated ND filter used for?
Let’s start with the basics: what exactly is a GND filter? If you are new to photography, you may not yet be familiar with the concept of a simple neutral density filter (ND). A GND filter works on a similar principle, except that instead of being fully dark across the entire surface, like an ND filter, it has a gradual transition. Most of the time, these filters are made of resin or optical glass. Lost already? Let me explain.


These filters are therefore dark only over part of their surface. In most cases, the upper part of the filter is darker, except with reverse GND filters, which are designed especially for sunrise and sunset scenes. We’ll come back to that later. For now, let’s look at the benefits of using this type of filter.


The advantages of a GND filter
Although digital camera sensors keep improving, they still cannot always capture a scene the way the human eye perceives it. In many situations, the scene you want to photograph will have a significant difference in brightness. This could be a beach in the middle of the day, for example, with very harsh light in the sky that is often overexposed. In landscape photography, you will very often have a foreground that is darker than the sky.
The idea is simple: in landscape photography, you will usually expose for the foreground with a small aperture, for example f/11 or f/14. Since the foreground is darker, the background, especially the sky, will often become overexposed. This is exactly where a graduated neutral density filter becomes useful.
It allows you, right when you take the shot, to reduce the brightness differences in your image and preserve more dynamic range. In practical terms, you help your camera sensor expose the scene more evenly. The filter balances the different brightness levels in the image thanks to its gradient, and you can see the effect directly through the viewfinder or on the screen. The amount of light is reduced in the sky. And yes, you can of course use a polarizing filter with a graduated filter.
We’ll talk about this again at the end of the article, but a GND filter can also be used in scenes where the horizon is not perfectly straight. Mountain landscapes with mist or atmospheric haze in the background are also excellent subjects. Beach or cliff scenes with an offset horizon can work very well too. As we’ll see later, you can rotate the filter holder to align the filter with the horizon you want, even if it is tilted.

Finally, another point I find very interesting is that it reduces the amount of time you need to spend in post-production. If you don’t shoot in RAW and/or don’t edit your photos much, this may not be a major concern. But for those who spend hours working in Photoshop or Lightroom, I think you’re better off spending more time behind the camera, out in nature, right? Even though I like working on a computer, when it comes to photography, I 100% prefer being outdoors.
The drawbacks of using a GND filter
I am convinced that using this type of filter is a very good idea, especially in landscape photography. However, it does have a few drawbacks:
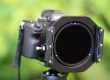
- The extra photo equipment: you may be thinking, “Wait, I’m just buying a filter, isn’t that enough?” Well… no, not quite. To use a GND filter, you need a specific filter system made up of two elements: a filter holder, which is placed on an adapter ring screwed onto your lens. So that means two additional accessories on top of the filter itself. Expect to pay between €100 and €200 for these two accessories, depending on their quality,
- The price of the filters: if you go for good-quality filters, prices rise quickly. A single filter can cost around €100 to €150,
- You will most likely need several filters with different transitions and densities, so the bill can climb even higher. We’ll come back to that later,
- GND filters also tend to darken your photo. You will often need to adjust the brightness of your image,
- Finally, a bit of practice is needed to use them properly, even though they are not complicated. It also depends on whether you use them alone or with other filters. I very often use my GND filter with my polarizing filter and my ND filter for long exposures.
You now have a good idea of what GND filters are used for, but also of their disadvantages. Now let’s see how to choose one.
2 - How to choose a graduated neutral density filter
To choose a GND filter, I would say there are three main criteria: the size, the type of transition, and the density of the filter.
Size
A graduated neutral density filter is usually rectangular. Its size varies depending on the lens you are going to use it with. Let me explain. In most cases, you will use a 100 x 150 mm GND filter.
Some brands also offer filters in 70 x 80 mm or 70 x 100 mm sizes, which are suitable for advanced compact cameras and some mirrorless systems. If you are using a DSLR, these are probably not the sizes you will need.
In some special cases, especially with wide-angle and ultra-wide-angle lenses from Canon, Nikon, Tokina, Pentax, Sigma, and other brands, standard-size filters cannot be used. Why? Simply because these lenses have a very wide angle of view, and you would see vignetting, or dark corners, appear in your image. Brands have therefore designed specific filters and matching filter holders for this type of wide-angle lens. Usually, these filters are 150 x 170 mm, or even larger, such as 180 x 210 mm, like these from Lee, for example. Of course, with this kind of large filter, the filter holder itself is also larger. By the way, if you’re looking for more information on this topic, I wrote a full article on special filter holder systems for wide-angle lenses.
The two main brands, NiSi and Lee, each have their own filter holder system and filters. In general, filters from one brand often fit quite well in the other brand’s filter holders, and this is usually specified. Well-known examples include:


As mentioned above, you will not be able to use a GND filter without an adapter ring for your lens and a filter holder system. The filter holder you need will therefore depend on the size of the filters you plan to use.
The NiSi Filters website explains the different types of filters and filter holders. However, I regret that there is no simple reference guide showing exactly which equipment, filter and filter holder, should be purchased for each lens.
The GND LEE filter website offers an excellent system where all compatible lenses are listed. By choosing the lens you’re interested in, you can clearly see which filter holder system and associated filters you should use. Very handy, in my opinion. This is the classic Lee filter holder, the one I personally own.
If you have any doubts about your choice, don’t hesitate to contact the brands directly. Given the price of the full setup, it is better to make the right choice from the beginning.
Type of transition
Once you have chosen the right size for your filters and filter holder, it is time to look at the filter transition. As mentioned earlier, a GND filter is dark only over one part of the filter, usually the upper part. In other words, part of the GND filter is completely transparent, often the lower part, and the higher you go up the filter, the darker it becomes. Here, we are talking about the transition between the transparent area and the dark area. There are four possible transition types for this kind of filter:
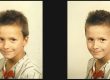
- Soft GNDs offer a very gradual transition between the dark and transparent areas. This type of filter is especially useful when you need a gentle transition between the foreground and the sky. It is widely used when there is no clear separation between the bright and dark parts of the scene, and when the difference in brightness is more subtle. For example: seascapes with mountains in the background, mountain landscapes, valley landscapes, and, more generally, scenes where the separation between bright and dark areas is not obvious.
- Hard GND filters are characterized by a clear and distinct transition between the dark area and the transparent area at the bottom of the filter. In other words, the filter is more or less dark depending on its density, but the transition is clearly defined near the center of the filter. They are particularly well suited to situations where the horizon line is distinct. For example: seascapes and seaside sunsets, even though there is another type of filter specifically designed for this, the reverse GND. Be careful when using filters with a hard transition if there are elements sticking up from the horizon, as they may become noticeably darkened.


Examples of ideal landscapes for using a soft GND filter on the left, and a reverse or hard GND filter on the right
- Medium GNDs are a good compromise between soft GNDs and hard GNDs. They offer a slightly stronger transition than soft filters, but without the very clear line of a hard filter. They are generally best used for hilly or mountainous landscapes, for example.
- Reverse GND filters are filters specifically designed for sunrise and sunset. They are somewhat similar to hard GND filters, except that the darkest part of the filter is located on the horizon. In other words, you have a very dark band in the center of the filter, which gradually becomes lighter toward the top. These filters are ideal for sunrise and sunset, because the brightest area in these situations is usually right on the horizon.
GND filter density
The last criterion to consider when choosing this type of filter, and one of the most important, is density. As with an ND filter, density refers to how dark the filter is. The density of GND filters is generally expressed in “stops.” As a general rule, available densities range from about 2 to 5 stops.
If you are new to photography, I invite you to read my article on exposure in photography, which summarizes and explains the different settings that define the exposure of an image: ISO, aperture, and shutter speed. A stop, also known as an “IL” or “EV,” can simply be understood as a difference between two exposure values. When you take the same photo at f/4 and f/2.8, there is a one-stop difference.
Now, when it comes to GND filters, the higher the number of stops, the stronger the effect compared with the same photo taken without a filter. Simply put, the more stops there are, the darker the filter will be. You should therefore think carefully about the situations in which you will use your filters most often. This will depend on your photography style, what you like to photograph, and the light conditions you usually shoot in. If you mainly photograph sunsets, you will probably be directed toward a reverse GND filter.
To make things a little more complicated, brands describe filter characteristics using:
- The optical density of the filter: for example, 0.6 or 1.2,
- The filter coefficient: the number after “GND,” for example GND 8 or GND 16. For information, this works exactly the same way as with ND filters,
- The number of stops: the difference in light compared with the same photo taken without a filter.
The following table summarizes this point:
| Coefficient of the GND filter | Density (D) | Stop (IL/EV) |
|---|---|---|
| GND 2 | 0,3 | 1 |
| GND 3 | 0,45 | 1,5 |
| GND 4 | 0,6 | 2 |
| GND 6 | 0,75 | 2,5 |
| GND 8 | 0,9 | 3 |
| GND 16 | 1,2 | 4 |
| GND 32 | 1,5 | 5 |
I’ll explain my recommendations below according to the type of photos you take and the situations you shoot in.
A quick note on adapter rings for filter holders. Generally, there are two types of rings: standard rings and special wide-angle rings. You can often buy them directly with a filter holder, or separately. So be careful to check the diameter of your lens closely.
3 - How to use GND filters
As mentioned above, you will first need to equip yourself with all the necessary gear: the filter holder system, the adapter ring, and your chosen GND filters. If the light is low, you will also need a tripod.
To keep things simple, here is the general order of use:
1 – Screw the adapter ring onto the lens you are going to use. Most of the time, you will need to remove the lens hood first,
2 – Place the filter holder on the adapter ring, making sure it is properly installed and securely in place,
3 – Choose the appropriate GND filter for the photo you want to take and place it in the slot closest to your DSLR camera on the filter holder. If you also want to use an ND filter at the same time, the ND filter will usually be placed first, then the GND filter second,
4 – Looking through the viewfinder of your DSLR, correctly place the transition of your filter over the landscape in front of you. You will see in real time that the filter darkens the sky,
5 – Once the filter is correctly positioned, at least according to what you see, take the shot as you normally would, either in manual mode or in a semi-automatic mode such as Av,

6 – Check the result on your camera and adjust the horizon line if necessary. Since the GND filter is slightly to strongly dark depending on the density chosen, it will tend to darken the scene. Very often, exposure compensation will be necessary, usually somewhere between +1/3 and +1 on your camera body.
In practice, you will use this type of filter very often when the light conditions are drastically different between the foreground and the sky, which, in landscape photography, is almost all the time. Living in French Polynesia, in the tropics, the light is very often harsh in the sky, and without a 0.9 or even 1.2 GND filter, it is very difficult to get a well-exposed image.
Also note that the filter holder rotates 360°, so it is possible to use a GND filter not only straight and horizontal, but also at an angle. This is very handy when the horizon in your scene is tilted, especially in seascapes.
You will need to run a few tests to make sure the exposure is correct while shooting, but using a GND filter itself is not that complicated.
4 - How to clean and store your GND filters
Considering the cost of the full setup, and especially the filters, I wanted to write a few lines about how to store and clean them. Nothing very complicated here. In my opinion, there are two very useful accessories:
- A high-quality cloth to clean filters and lenses. You will definitely need one, especially if you shoot by the sea, with water, spray, and sand,
- A filter storage system. The two major brands offer them: NiSi and Lee. At NiSi, the system is more robust than at Lee. That is good in terms of protection, but less convenient in terms of space in your camera bag. Lee’s version is a softer pouch. It’s up to you.
In any case, you should include storage in your budget. Make sure the storage system matches the size of your filters. There are, of course, storage solutions for all sizes, although 100 x 150 mm is still the most common. You can’t just leave these filters loose in a camera bag.

5 - Which GND filter should you choose first?
Last point in this long article: choosing your graduated neutral density filters. In the previous paragraphs, I explained everything you need to know before buying. If I had to summarize, I would say you should ask yourself these questions:
1 – Is the purchase intended for a specific lens, such as an ultra-wide-angle Canon 14-24mm on a full-frame sensor, or a Nikon 14-24mm? If the answer is no, move on to the next step,
2 – You will therefore start with a standard 100 x 150 mm size for the GND filter,
3 – Now evaluate the situation in which you will use your filter most often: by the sea or in the mountains. Yes, it is a bit binary, but it helps when choosing the transition. If you live near the sea and like long exposures, for example, go directly for a hard transition,
4 – The density will depend on the conditions in which you take your photos. I rarely recommend GND filters below 3 stops. In my opinion, cameras are relatively good at handling small brightness differences in a scene. So, at the very least, I would choose a GND8, which is 3 stops. I have one, and sometimes I still don’t find it dark enough. I plan to buy a GND16 or GND32 hard filter for seaside photography.
Overall, from what I have been able to test and read online, two brands stand out: NiSi and Lee. However, other brands also offer graduated filters, such as Rollei, Hitech, Singh-Ray, Cokin, Haida, Tiffen, and Benro.
To start with, I would get a soft GND8 for everything outside the seaside, and a hard GND16 if you take a lot of photos by the water. If you can afford a reverse GND for sunsets, that’s great too.
It is obviously impossible to mention every reference I could recommend. In any case, your choice will often depend on your budget, your photography practice, and your camera system, whether full frame or APS-C. Here are some legitimate recommendations for different types of photos and different budgets.
| Filter | Use | Details |
|---|---|---|
| Lee - GND Reverse Filter | Sunset / Sunrise | Amazon |
| Nisi - GND Reverse Filter | Sunset / Sunrise / Low light | Amazon |
| Lee - Soft Edge GND Filter 0.9 | Hill / Mountain / Non-linear landscape | Amazon |
| Nisi - Soft Edge GND Filter 0.9 | Hill / Mountain / Non-linear landscape | Amazon |
| Lee - Hard Edge GND Filter 1.2 | Linear landscape (sea with horizon) | Amazon |
I’ve now come to the end of everything I wanted to say about graduated neutral density filters. You should now be able to choose the right one much more easily. If you have any questions or want something clarified, don’t hesitate to leave a comment below the article. If you want to learn more about filters, I invite you to read my article on the polarizing filter.
By the way, I’ve just finished a full test of the KASE K9 filter holder system, as well as a set of filters they offer: polarizer, ND, and GND. Don’t hesitate to take a look!
See you soon, and happy shooting!

Written by Sylvain PONS
I've been passionate about photography since 2010, learning as I went along. Today, I dedicate myself to guiding others in their choice of camera gear and sharing a variety of tips to improve their photography skills.
Despite our care, a mistake may have slipped into this article. If you find any, please don't hesitate to let us know so we can correct it as soon as possible and keep our information up-to-date!


Very informative and useful for me,Thanks
Thanks 🙂
Sylvain